Install Debian Linux on x86/AMD64 Computer with Latest Kernel
Last Updated on July 13, 2023 by Hammad Rauf
Disclaimer: These instructions are tested on my computer system and software, your computer system and software may be different. These instructions are meant to document my update process. You may use them for your installation, at your own risk.
Debian (Why Debian?) is a distribution of the free Linux Operating system. It is core distribution on which Ubuntu, Kubuntu, RaspberryPi OS, and many other distributions are based. It makes sense to work on a Debian installation, because this way your work should be mostly compatible with Ubuntu, Raspberry Pi, etc.
Linux-Mint is well known Ubuntu based Linux Distribution which uses Windows like Cinnamon Desktop. Linux-Mint has another similar distribution based on Debian, the core on which Ubuntu is based, it is called LMDE. LMDE is short for “Linux Mint Debian Edition”. Its current version is 5, LMDE 5 “Elsie”. In this blog I will be describing how I installed it on my computer.
Contents
Download the ISO Image
The ISO Image Installation file of the LMDE can be downloaded from the LMDE Download Page. Either use the direct Download mirror sites close to your location or use a Torrent downloading client like BitTorrent/uTorrent. You have the option to choose 64-bit or 32-bit version. Since I had a fairly new computer, I downloaded the 64-bit version.
Burn a Bootable USB Disk
Next we need to have a bootable installation media. Since my computer had the capability to boot from a USB stick I created a bootable USB stick with LMDE image file. Other options are to create a bootable CR/DVD ROM, if you have an internal or External DVD drive available.
To create the bootable USB Stick I downloaded Etcher (Bootable USB Creator) from the Download Page. Install Etcher. Once Installed launch Etcher, provide the path to the downloaded ISO file as the source, the destination must be your USB Thumb drive. Burn the image and let it complete. Once it is completed, you can close Etcher.
Installation
I had a spare Hard Disk (256 GB) available to me that was not being used for anything else. So I decided to keep my Windows 11 and LMDE on separate disks, and install LMDE on the 256 GB Hard Disk. Although Linux and Windows 11 can be installed on the same disk also, but I would recommend separate disk. It will be much easier to boot into either one, Windows or LMDE by using the boot sequence hot key (F11, F2, DEL Keys etc.) during the boot process. The disk size can be as small as 32GB but I would recommend a 64GB hard disk or SSD.
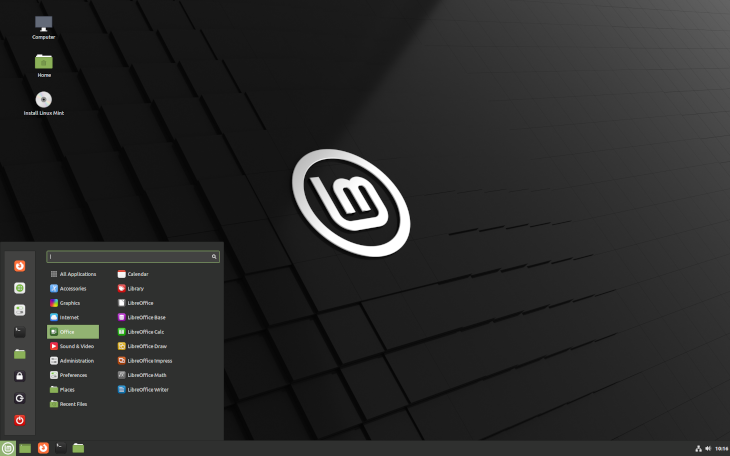
Insert the bootable USB disk in the computer and reboot or start the computer. You may have to press the boot sequence hot key (F11, F2, DEL Keys etc.) during the boot process, to select the USB disk and boot from it. Once the LMDE starts up, play around and the Menu’s and applications. Nothing is installed yet on your computer, it is loading everything from the USB stick.
Once you are ready to install, click on the CD ROM Icon on the desktop that says – “Install Linux Mint”. This will start the permanent installation of LMDE on your computer. The rest of the installation process is somewhat similar to the Linux-Mint Installation Steps documented on the Linux-Mint website. Once you have installed it please continue with the next steps given below.
During the Installation if you are installing on a Computer that already has another Operating System like Windows 11 installed on it, you will get an additional prompt for installing GRUB. GRUB is a Boot Loader that lets you choose which OS to boot your computer to. You have the option to install it on either disk/SSD, the disk for LMDE or the Disk for Windows 11 (It does not damage Windows 11 installation). I would recommend installing it on the LMDE disk/SSD. You can also choose not to install GRUB, but then during EFI Boot process the LMDE disk/SSD may not be detected, and you may need to run “Boot Repair” from the Live LMDE USB stick you prepared earlier. You can use “Boot Repair” and/or “GRUB Customizer” to tailor GRUB as per your liking later.
The found out out that there was no direct way of updating my Graphics Driver and Sound Driver, and the instructions given for Linux-Mint do not match the LMDE distribution. The only way forward as suggested on the help forum was to update the Linux Kernel. It is documented below.
Time Adjustment on Dual OS Systems
On Computer systems where Windows 11 is also installed the System Clock time is altered by LMDE every time you boot into that. To prevent that from happening, open a Terminal (Console) session. and type the following command:
timedatectl set-local-rtc 1
Update the Installation
In these steps we will be installing the absolutely latest version of Debian Kernel available. This version of kernel is usually not supported by the LMDE distribution. But we want to install it anyway because our computer Device Drivers are not working properly.
Before you start updating the kernel, it is a good idea to update the installation of LMDE. Just click on the Shield Icon (LMDE Update Manager) in the lower right corner next to the system clock. Make sure everything is selected, and then let it run. It will download all updates (including a slightly newer Kernel image), and install them. You will have to reboot the computer after updates are installed. The Kernel image installed by the update manager is not the latest kernel image available, so it may not solve your driver issues. Follow the steps in the next section to explicitly download the latest kernel.
Update the Kernel
To install the latest Kernel version available for LMDE perform the following steps on a Terminal Console screen, one step at a time.
uname -r
uname -n
uname -a
The above 3 commands will list the name and version of the currently installed LMDE Kernel version and Computer name. This information will be useful in determining which newer version of Kernel to install in the next steps.
sudo apt update
sudo apt search linux-image
The first command updates all repositories for the package manager. The Second command shows all packages that can be installed with the words “linux-image” which marks Kernel images. You will see a list of many available kernel images. At the time of this writing, for a Intel/AMD based CPU the kernel image that determined to be the latest is “linux-image-6.0.0-0.deb11.2-amd64”. So you can issue the command to install it, and then reboot your system with the next command given.
sudo apt install linux-image-6.0.0-0.deb11.2-amd64
sudo reboot
Hopefully everything works out and you are able to log back in to LMDE. All your Device Driver issues should be resolved now, since you are running the latest kernel available. To check that your kernel is indeed the latest one type the following commands.
uname -r
uname -n
uname -a
Force Update Manger to Show Latest Kernel Images
LMDE Update Manager is a very nice tool that automatically finds the latest updates for all software packages installed on your system and prompts you for installing them periodically. But there can be an issue with that now since you have updated the kernel version to be the absolutely latest version. The official LMDE distribution is still using an older Kernel version. So when the official LMDE distribution starts supporting a slightly newer version of the kernel, which is slightly newer but still older then the version of the kernel you have already installed in above steps, you will be prompted to install it. This is not a big issue, you can always uncheck that version of the kernel from the list of software to be updated. But an interesting trick was mention on this site. I am documenting it below.
Use a text editor (with “sudo” privileges) to create a file “preferences” with the following contents in the folder /etc/apt/.
Package: *
Pin: release a=bullseye
Pin-Priority: 500

Package: linux-image-amd64
Pin:release a=unstable
Pin-Priority: 1000

Package: *
Pin: release a=unstable
Pin-Priority: 100
Alternatively you can use the following command from Terminal/Console to do the above directly from command line.
sudo tee /etc/apt/preferences<<EOF
Package: *
Pin: release a=bullseye
Pin-Priority: 500

Package: linux-image-amd64
Pin:release a=unstable
Pin-Priority: 1000

Package: *
Pin: release a=unstable
Pin-Priority: 100
EOF
Afterwards make sure that the file contents are like we expect. To confirm use the following command from Terminal/Console.
sudo cat /etc/apt/preferences
Reference Links
- https://www.debian.org/intro/why_debian, Why Debian?, Date Accessed: December 30, 2022
- https://ubuntu.com/download/desktop, Ubuntu Desktop, Date Accessed: December 30, 2022
- https://kubuntu.org/getkubuntu/, Kubuntu, Date Accessed: December 30, 2022
- https://www.raspberrypi.com/software/, RaspberryPi OS, Date Accessed: December 30, 2022
- https://linuxmint.com/, Linux-Mint, Date Accessed: December 30, 2022
- https://linuxmint.com/download_lmde.php, LMDE, Date Accessed: December 30, 2022
- https://linuxmint.com/edition.php?id=297, LMDE Download Page, Date Accessed: December 30, 2022
- https://www.balena.io/etcher/, Etcher (Bootable USB Creator) Download Page, Date Accessed: December 30, 2022
- https://linuxmint-installation-guide.readthedocs.io/en/latest/install.html, Linux-Mint Installation Steps, Date Accessed: December 30, 2022
- https://forums.linuxmint.com/viewtopic.php?f=248&t=370744, Author’s LMDE Forum Support Question for Drivers, Date Accessed: December 30, 2022
- https://www.linuxcapable.com/how-to-install-linux-kernel-mainline-on-debian-11-bullseye/, Update Kernel, Date Accessed: December 30, 2022

One thought on “Install Debian Linux on x86/AMD64 Computer with Latest Kernel”