Controlling Servo Motor with a Knob and a Limit
Last Updated on August 17, 2021 by Hammad Rauf
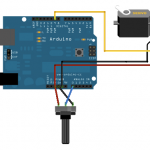
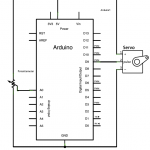
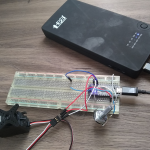
Arduino Uno and Arduino Nano are two of most extensively used hobby micro-controller boards. I found a web article about controlling a servo motor with a knob (Potentiometer, or Pot) , given here. Since I had a Pot lying around and had ordered cheap clone of Uno and Nano from Aliexpress.com, I thought it would be a great learning opportunity for my son (Grade 8) to see it built.
The original article describes exactly what is needed. It uses Uno, that I replaced with Nano. I could use the same pin numbers on Nano as in the original article. The original code allows one to control the servo motor which can move in both directions clockwise and anti-clockwise in unlimited rotation.
Arduino IDE is an easy to use editor and compiler for Arduino and compatible products. For download link please see the Further Reading section below. Here is a link for a good article on how to get started with Arduino IDE.
Hardware Required
- Arduino Uno or Nano Board
- Servo Motor (Continuous rotation type used here)
- 10k ohm potentiometer
- hook-up wires
- A Computer with USB Port (For running Arduino IDE)
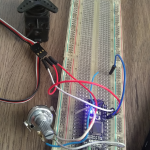
- Bread Board (Optional)
- A 5 Volt Power Bank (Optional – For running the circuit independent of the computer)
Adding A Limit To Servo Rotation
The program given in the original article is very good. My modification to the C program introduces a limit on the rotation of the Servo. The idea is where ever this code is used, it will be physically limited. For example, there will be limit on servo movement because of length of the screw a servo is turning.
I have also added some Print statements to allow us to debug and calibrate your particular servo motor. The output of these print statements can be seen on the Serial Port Listener window in Arduino IDE.
Code Listing
/*
Controlling a servo position using a potentiometer (variable resistor)
by Michal Rinott <http://people.interaction-ivrea.it/m.rinott>

modified on 8 Nov 2013
by Scott Fitzgerald
http://www.arduino.cc/en/Tutorial/Knob

modified on Sept 29, 2017
by Hammad Rauf
*/

#include

Servo myservo; // create servo object to control a servo

int potpin = 0; // analog pin used to connect the potentiometer
int val; // variable to read the value from the analog pin
const int P_LIMIT = 2000; // One directional rotation Maximum Limit
const int N_LIMIT = -2000; // One directional rotation Maximum Limit
int cur_location = 0; // Current location of Maximum Limit
int midp = 0; // Value from mid point of 0 to 180 ie 90, as mid point.
const int my_motor_mid = 5; // Servo variance actual mid point is at 95.

void setup() {
	myservo.attach(9); // attaches the servo on pin 9 to the servo object
	Serial.begin(9600);
	Serial.println("Arduino Knob with Limit - Debug");
	delay(2000);
}

void loop() {
	val = analogRead(potpin); // reads the value of the potentiometer (value between 0 and 1023)
	val = map(val, 0, 1023, 0, 180); // scale it to use it with the servo (value between 0 and 180)
	midp = val - 90;
	if ((midp) >= 0) {
		if (cur_location <= P_LIMIT) {
			cur_location += midp;
		}
	}
	else {
		if (cur_location >= N_LIMIT) {
			cur_location += midp;
		}
	}
	Serial.print("midp=");
	Serial.print(midp);
	Serial.print(", cur_location=");
	Serial.println(cur_location);
	if ((cur_location >= N_LIMIT) && (cur_location <= P_LIMIT)) {
		//Serial.println("Inside-1");
		myservo.write(val); // sets the servo position according to the scaled value
		delay(15); // waits for the servo to get there
	}
	else {
		//Serial.println("Inside-2");
		myservo.write(my_motor_mid + 90); // sets the servo position to mid point
		delay(15); // waits for the servo to get there
	}
}
Further Reading
- Original Arduino article, https://www.arduino.cc/en/Tutorial/Knob , Date accessed: September 30, 2017.
- Arduino Uno, https://store.arduino.cc/usa/arduino-uno-rev3, Date accessed: September 30, 2017
- Arduino Nano (clone), http://robotdyn.com/catalog/boards/nano_v3_ch340g_usb_cable/ , Date accessed: September 30, 2017
- Arduino IDE (C Editor), https://www.arduino.cc/en/Main/Software , Date accessed: September 30, 2017
- Getting started with Arduino IDE, https://learn.sparkfun.com/tutorials/installing-arduino-ide , Date accessed: September 30, 2017
- What is a Continuous Rotation Servo? http://education.rec.ri.cmu.edu/content/electronics/boe/robot_motion/1.html Date accessed: September 30, 2017
- Servo library Write() function, https://www.arduino.cc/en/Reference/ServoWrite , Date accessed: September 30, 2017