
Home Email Server Setup with Personal Domain
Last Updated on October 2, 2025 by Hammad Rauf
You can have a personal Home Email Server Setup without breaking the bank. It can also be used by small businesses. You will have total control over it. You can create as many email post boxes as you like (Limited by your server capabilities). This post will document the steps and commands used for this purpose. It can be implemented on Raspberry Pi (or similar Single Board Computers), using Debian (Linux), Postfix, Dovecot, etc. as discussed below. You will be paying for the personal Domain Name, Email Store Forward service, and a SMTP Relay Host – the cost of these 3 should be between US$ 20 to US $ 50 per year, depending on the service provider you choose. The benefit is that all family members or small business employees get email post boxes on your server, you do not pay anything more. You can have unlimited email post boxes limited only by the size of your hard disk on your email server.
Many Internet Service Providers (ISPs) like Rogers, Bell and others block the default port for sending and receiving email directly on your home network. Why they do that, security or pure commercial reason is a separate debate, I will not delve into that here. The ISPs also keep changing your Router/Gateway’s public IP Address, ie., it is not a static IP Address and can change at any time. In this post we will see ways of over coming these constraints in a budget friendly way.
Disclaimer: Opening ones Internet Router to additional traffic and installing Web Server and Email Server Software in your home computers can expose you to potentially malicious traffic and users and bots on the Internet. These instructions are primarily designed to document the general process, these may not be written with fool proof security in mind. The author assumes no responsibility of security, nor functionality. Follow these instructions at your own risk only. If you continue, you are agreeing to this disclaimer.
Attribution: Free Email Icon used attribution: Email icons created by Smashicons – Flaticon
In particular we will be discussing the following topics in this post.
Inventory and Cost Estimates
Hardware
Domain Name Registration
Dynamic DNS Service
Operating System
Static Fixed IP Address
Dynamic DNS Update Client Software
Port Forwarding on Home Router
Installation of Apache Web Server
Configuration of Website
Free SSL Certificate for Website and Email Server
Installation of Email Server Software (Postfix and Dovecot)
Configuration of your Email Server
Configuration of Email Relay Provider – Incoming and Outgoing
DNS Records for Email
Testing Email Setup
Adding a New User Email Post Box
Connecting to your Email from Android Device
Connecting to your Email from PC – Windows Mail
Further Reading
Inventory and Cost Estimates
You will need the following items in the duration of this setup.
| Item | Description | Estimated Cost | Cost Period |
|---|---|---|---|
| Hardware | It can be Raspberry-Pi, or any other Single Board Computer. Choose a computer that consumes less Electrical Power and makes less noise. It will remain turned On, 24 hours a day 7 days a week. | CAD$ 50 to 250 | One time |
| Internet Connection | Internet connection from a provider like Rogers, Bell, or Others. Also known as your Internet Service Provider (ISP). | Varying | monthly |
| Domain Name Registration | Registration of a custom Domain Name of your choice. For example "mybusines.com", or "myfamily.ca". Email addresses will be using this domain name like, for example: "abe.lincoln@mybusiness.com", "sarah@myfamily.ca", etc. Domain Names are translated into matching IP Address when a DNS lookup is performed. So this way we do not need to remember IP Address but only remember the domain name of a site, or email address. | CAD$ 10 to 30 | Yearly |
| Dynamic DNS Resolution | ISPs provide your home router with different IP Addresses over a period of a year. The IP Address can also change anytime. Dynamic DNS Resolution allows your domain name to always have the correct IP address, even when your ISP changes the IP Address. This is also known as DDNS. There are free DDNS services, but when using a custom DNS name DDNS service may also need to be purchased. | CAD$ 0 to 13 | Yearly |
| DNS Records Editing Capability/Service | Domain name registration by default creates a DNS A-Type record. But for email setup, we need several other DNS record types, in addition to the A-Type record. Your DNS/DDNS provider may charge extra for providing these additional DNS Records. | CAD$ 0 to 13 | Yearly |
| Email Store-Forward Service | Most ISP block the relevant ports to receive email from the Internet. We will need to pay for this store-forward service from a third party vendor, which should be more economical as compared to getting this service from your ISP. | CAD$ 13 to 22 | Yearly |
| Email (SMTP) Outbound Relay Service | Most ISP block the relevant ports to send outbound email to the Internet. We will need to pay for this SMTP Protocol relay service from a third party vendor, which should be more economical as compared to getting this service from your ISP. | CAD$ 13 to 22 | Yearly |
Hardware
You will need a small computer that can remain turned on 24 hours a day 7 days a week. This is because if you turn it off, your incoming email can be lost forever. Ideally it should consume very low electrical power, and should be low noise device. I would recommend on the minimum a 4 core CPU device. Raspberry Pi or similar form device may be ideal. Another possibility is using a used thin client device or one of the many Intel J4125/N5095/J6426 based mini PC. Storage (Hard Disk/SSD) can be a minimum of 256 GB. At minimum the device should have 1 ethernet port, the faster the better. It can be ARM Based CPU or Intel/AMD CPU. I would prefer a passive cooling, fan-less device, that radiates extra heat using metal fins, so it can be extra low noise. Atleaset 2 GB on board RAM is the minimum recommended amount for Debian 12. I am using 8 GB RAM in my setup. We will refer to this computer as the “target hardware” or “your email server” in the rest of this article.
In this article I will be installing on Intel/AMD architecture based machine.
Domain Name Registration
There are free Domain Name services but for an email server setup you need to own your own Domain Name. You can choose a Domain Name Registrar that allows you to change the DNS servers list for your Domain Name. One such service is GoDaddy.com. You may also explore the option of Registering your Domain Name directly with the Dynamic DNS Service Provider (see next section), if they offer this service. Almost all Domain Name Registration services offer Top Level Domain (TLD) Names like *.com, *.net, and *.org but you may need to find specialized Domain Registrar’s for specific TLD’s like *.uk, *.ca, *.pk, *.in, *.cn. Usually it should cost you from US$ 10 to US$20 for 1 year of registration. Sometimes there may be a promotion or discounted offer for lower first year price.
Usually Domain Name Registration means that an A-Type record will be created in the DNS Server database of your domain registrar. An A-Type record is simply an “(IP) Address” record. If you do not have a website initially, it can be pointing to a parking web-server page provided by the registrar. You will be able to change this IP address since you have paid for this custom Domain Name. Please note that for this article’s purpose we need a Domain registrar, that allows us to even change the primary Name-Server (database) for this Domain Name. We would like our DNS Name Server’s database to be hosted at a Dynamic DNS Service provider (see next section).
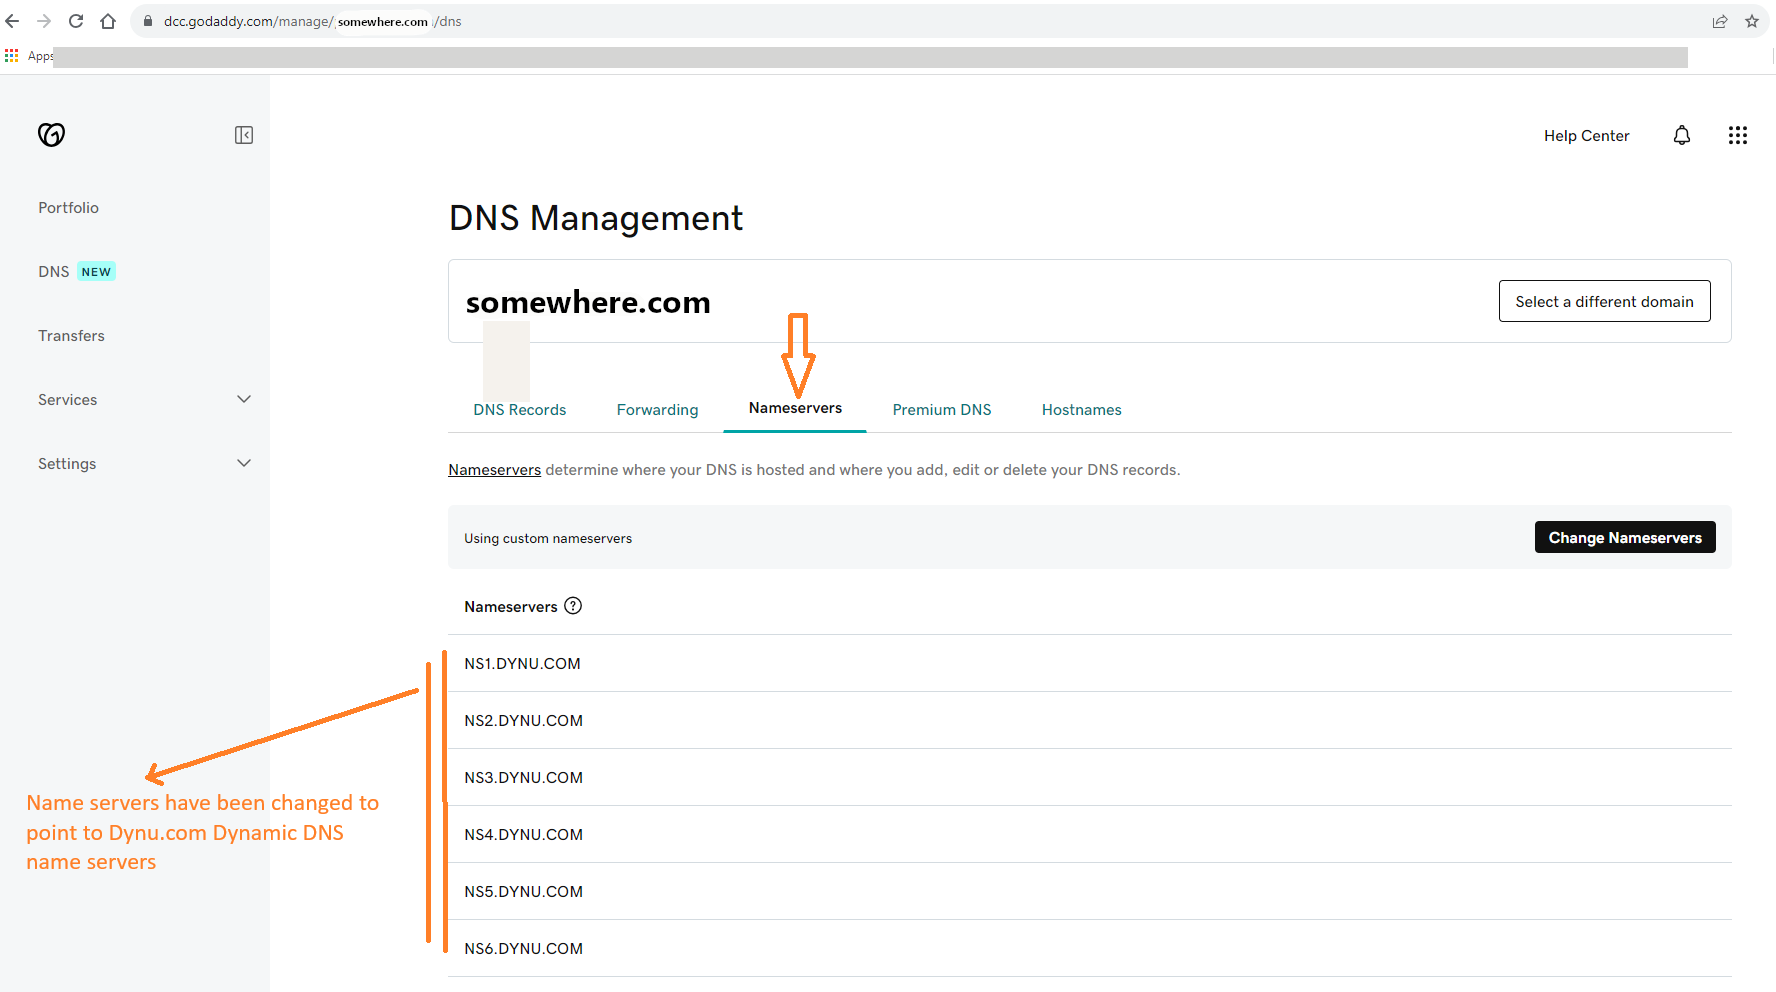
For the purpose of this article we will assume that we have registered a personal Domain Name of “somewhere.com” at GoDaddy.com. The following screen shot shows the Go-Daddy.com website console for managing your domain. In particular it is showing the Name-Servers tab, after the Name servers were changed to point to Dynamic DNS Service Name-servers.
Dynamic DNS Service
When we get Internet Connection from an Internet Service Provider (ISP), they usually give us a router/gateway device through which we connect to the Public Internet. This Router itself has a public IP address on the Internet. If at any time I know this IP address, then I can connect to my home router from outside networks. For email and web server that is hosted in my home, this is a desired capability, because then I can bind my custom Domain Name to this IP address. But usually ISP’s keep this IP address as a dynamic IP address and it frequently changes.
A Dynamic DNS service either assigns you a Dynamic DNS Name or lets you bring your custom DNS name and link it with a Dynamic IP Tracking Service. This service constantly monitors your home router Public IP address and updates your DNS Name Record to point to the correct IP address at all times. You can get a free Dynamic DNS name also from them for testing it out. You need to enable a part of this system on your home network. Sometimes the customer side part is either Dynamic DNS capability in your home router, or a small Application running on any computer in your local network. We will discuss more on how to install this small utility application on your target hardware in a later section.
Some examples of Dynamic DNS (DDNS) service providers are No-ip.com , DynDNS and Dynu.com.
In this article we will be using Dynu.com’s Dynamic DNS Service. Please register for a free service Dynu.com, later on when you are comfortable and you need it, you may upgrade to a paid service.
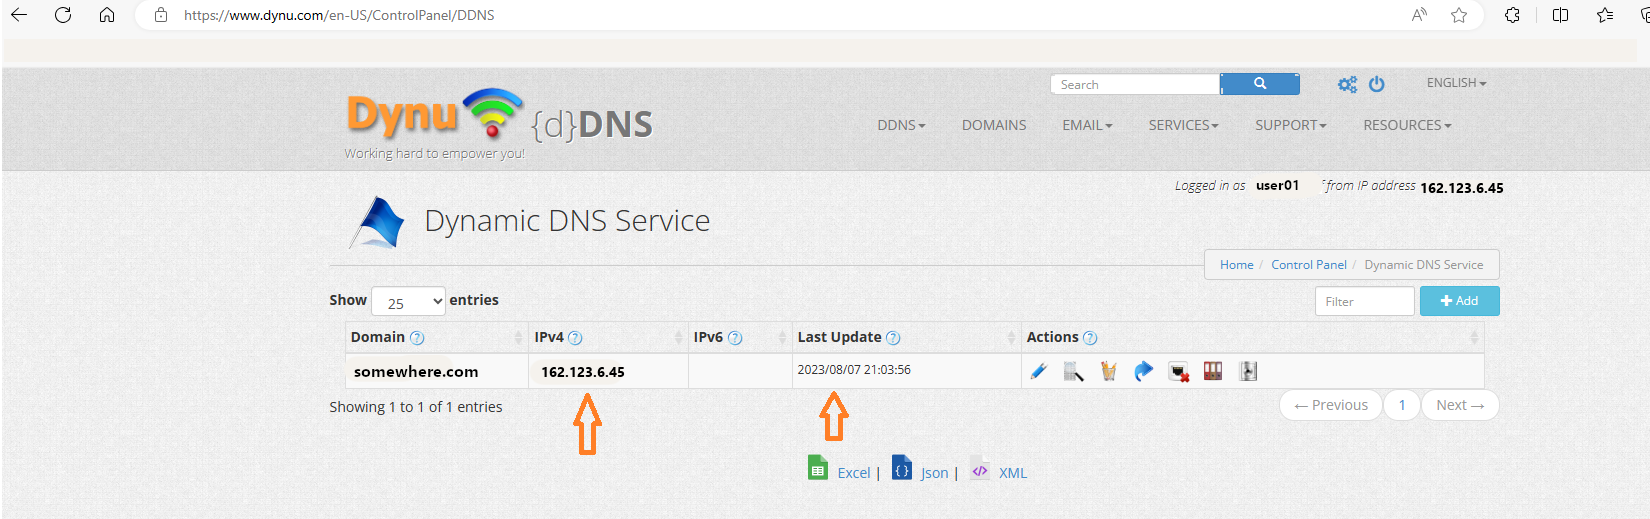
Following is a screen shot from Dynu.com control panel showing the status of Dynamic DNS service. It is showing the currently assigned Public IP address to the home router and also when this entry was automatically updated. Note: Additional configuration for this service will be performed in a later section.
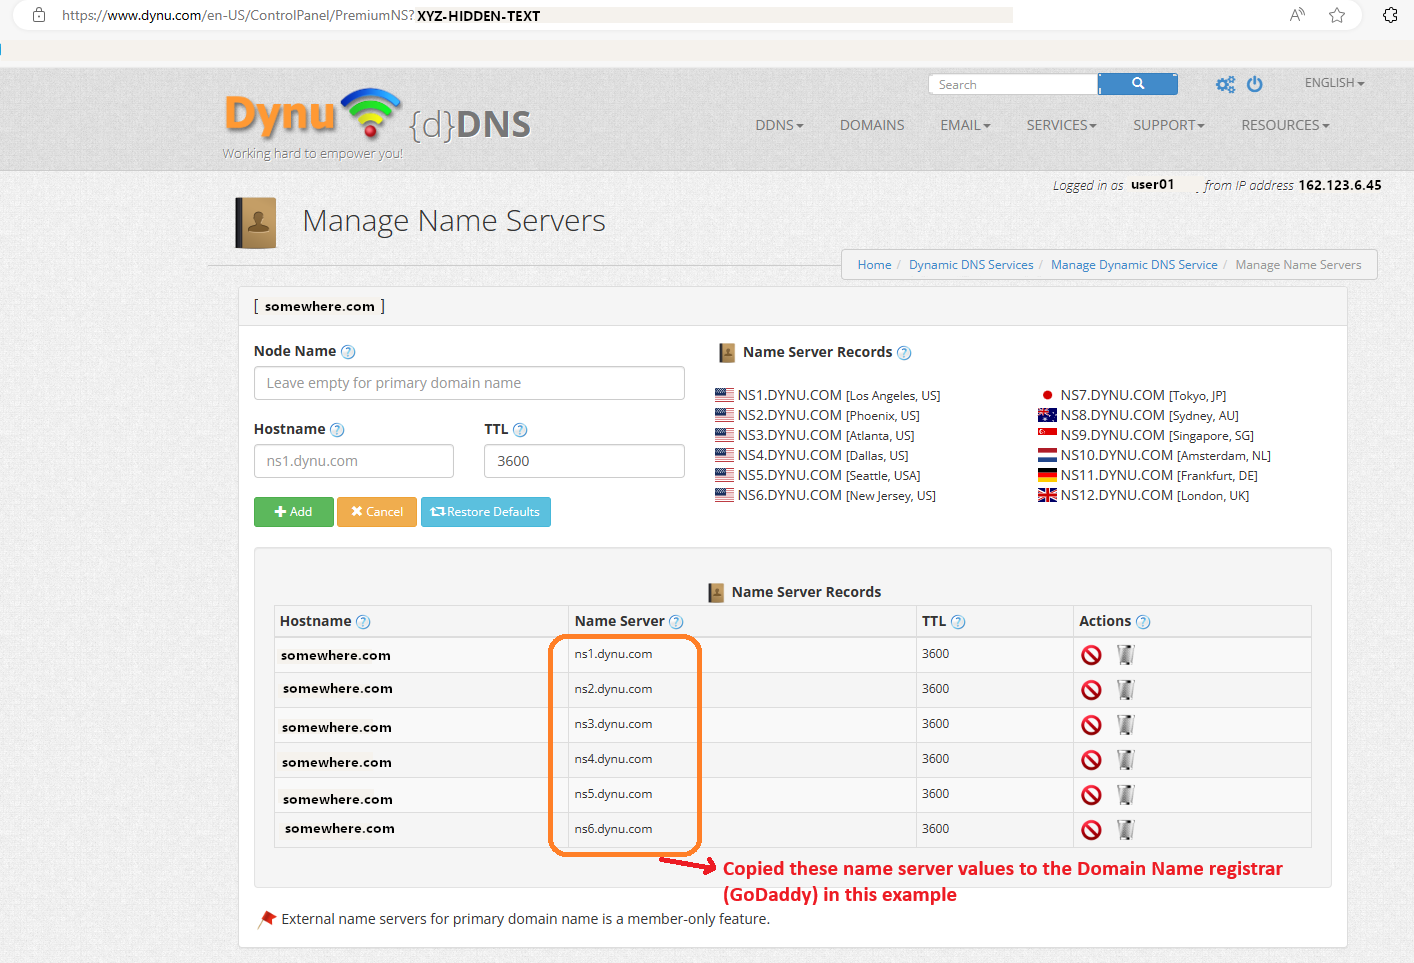
Following is another screen shot from Dynu.com control panel, this time showing a list of Name Servers. Values from this list are used to modify the Domain Registrar’s Name Server list (GoDaddy in this article).
Operating System (OS)
The operating system on the device will need to be a Linux based Operating System. Linux is an open-source and usually free Operating System. The instructions in this article have been tested on AMD-64 based Debian 12 “Bookworm” Linux. Since Raspbian, Ubuntu, Mint, etc. are based on Debian, these should mostly work on these OSes also. Follow your Hardware specific instructions to install Debian 12 or any other similar operating system on your device.
Installation of a Linux Graphical User Interface (GUI) Desktop is not necessary for this email server setup (If you are comfortable using command line only), but having a GUI Desktop like GNOME, KDE Plasma, may make it easy for you to use the computer. Installing a GUI Desktop otherwise makes some difference performance wise. But with our hardware specification the performance gain of a Non-GUI Server may be insignificant. The only other thing with GUI installation is the OS size on disk will become large. Note that almost all instructions in the tutorial will be based on Command Line Interface(CLI) and GUI may not be used at all. But having a GUI will make it fun to use afterwards, if you wish to use this server for other purposes also.
Following steps document the OS Installation process using the Installer at this link debian-12.1.0-amd64-netinst.iso. You have to choose the correct *.iso file based on your target Hardware specific CPU architecture. You can download this installation software CD image file (*.iso) on your PC, MAC or Linux Desktop or Laptop. Then you need to burn this onto an Installation Media like USB Thumb Drive or External DVD, that you will use to boot the target Hardware for the first time. If using a USB Thumb Drive, then you may use Balena Etcher or some other similar tool to prepare the USB from the Downloaded *.iso file.
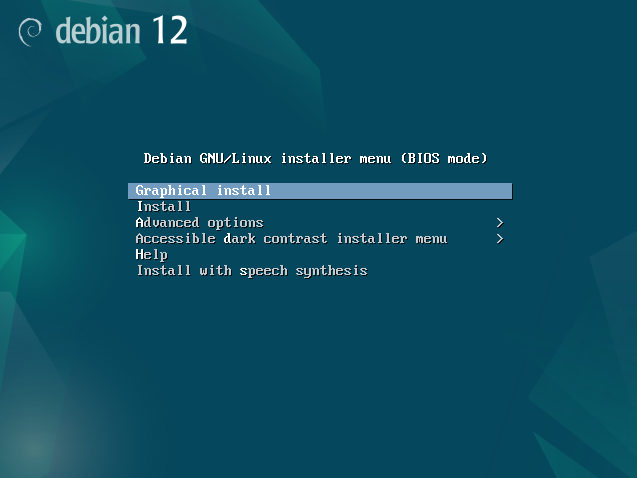
Let us start with the Installation steps. Connect your USB Thumb Drive (Or external DVD) to the target hardware, and boot from the installation USB Thumb Drive. For Installation using this download you will need an active (Ethernet) Internet connection to your computer. Starting the installation can be done using Graphical Install or Standard (Non-Graphical) Install. “Graphical Install” means that you want the installation-task done using Windows and Mouse – Decision of whether you choose to install/deploy the GUI Desktop software on the hard disk will be done later on.
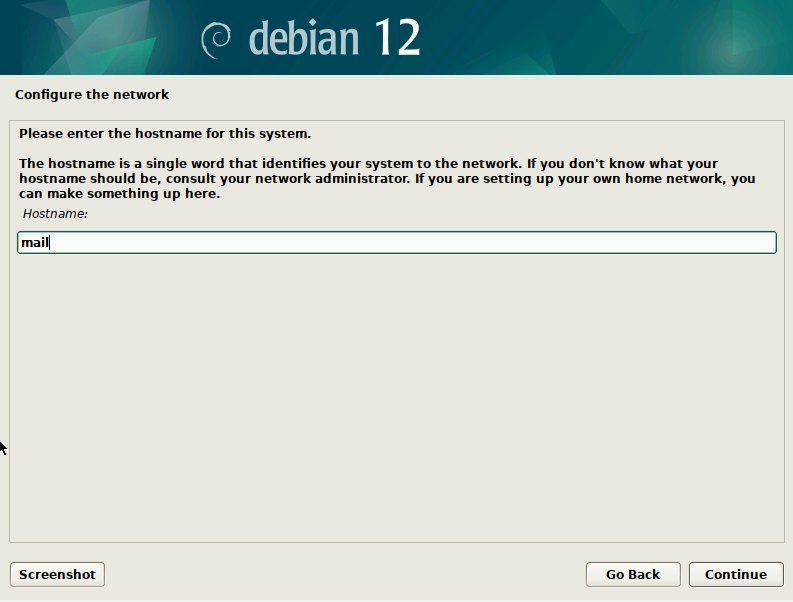
If we use Graphical Install option, then the next choices are “Select a language”, “Select your location”, “Configure the Keyboard”, and then “Configure the network” screen appears. Here you can specify the “Hostname” for your email server. I recommend using “mail” as the host name.
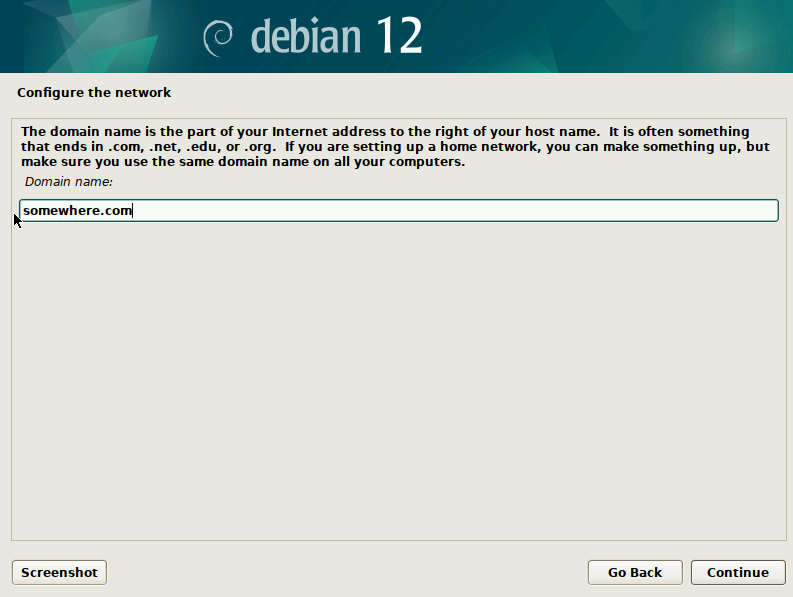
Then in the next screen provide the “Domain name”, this should be the same Domain name that you have registered previously.
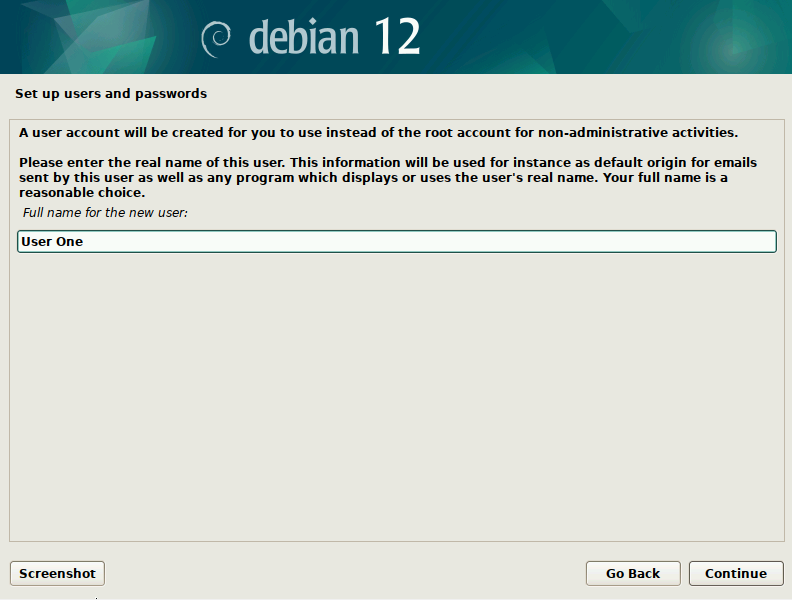
Then the next screen will be for “Set up users and passwords”. Choose a root password on this screen. Next screen will be “Set up users and passwords”. In this screen you have to create a user account for non-administrative activities. I will assume this user name to be “User One”.
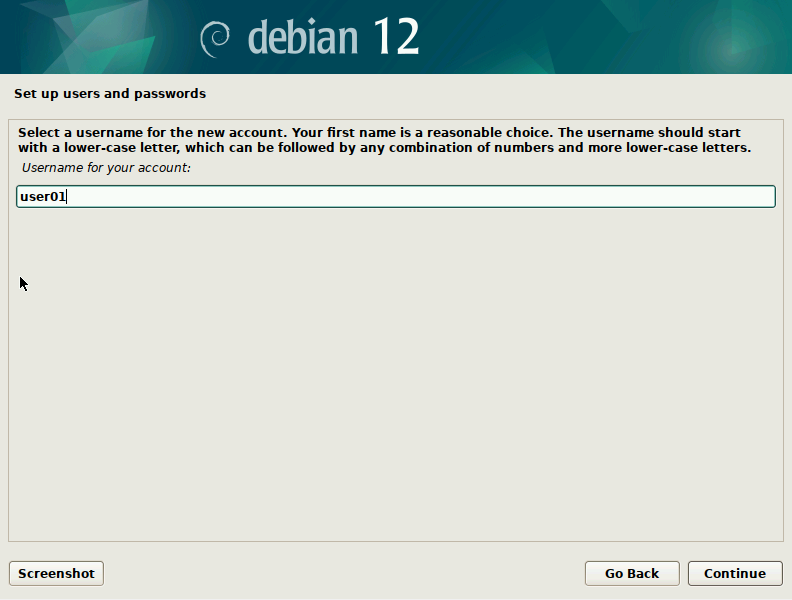
Then the next screen is “Username for your account:”, this is the login id for the “User One” user. I will choose “user01” as the login ID.
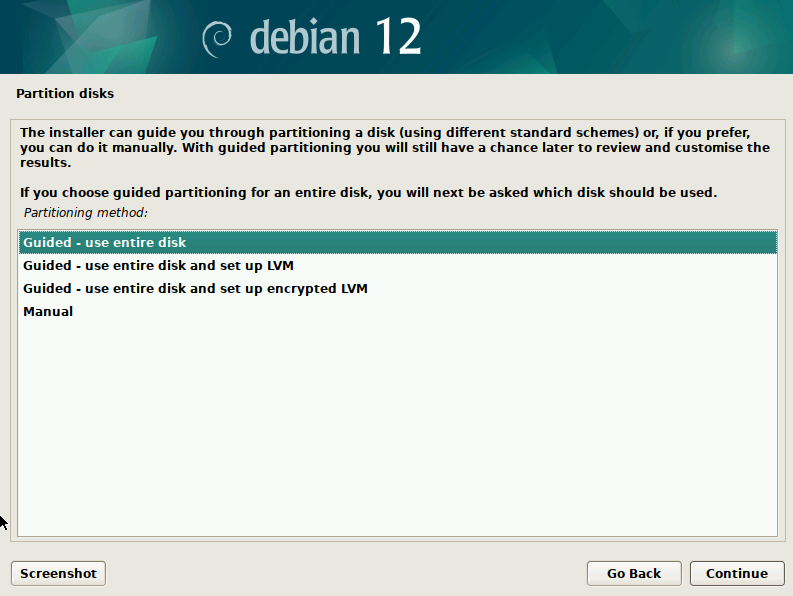
Next screen is for “Choose a password for the new user”, fill it with appropriate password value. Next screen is for “Configure the clock” where you select the time zone. The next screen will be displayed after the Installation software detects your Hard Disk/SSD Storage Device. It is titled as “Partition disks”. Unless you have a reason to choose another option, choose the “Partition method:” to be – “Guided – use entire disk”.
On the next screen, it will show you the detected Disk Controller and Disk Name (and capacity) where the Operating System will be installed. If you have more then one hard-disk/SSD then make sure you choose the correct drive in this screen. On the next screen it will ask for the “Partitioning scheme:” to use for the selected disk. You can choose “All files in one partition (recommended for new users)” option. Next screen will be a confirmation of all the choices you made for Partitioning of disks, before the disk changes are actually written to the disk.
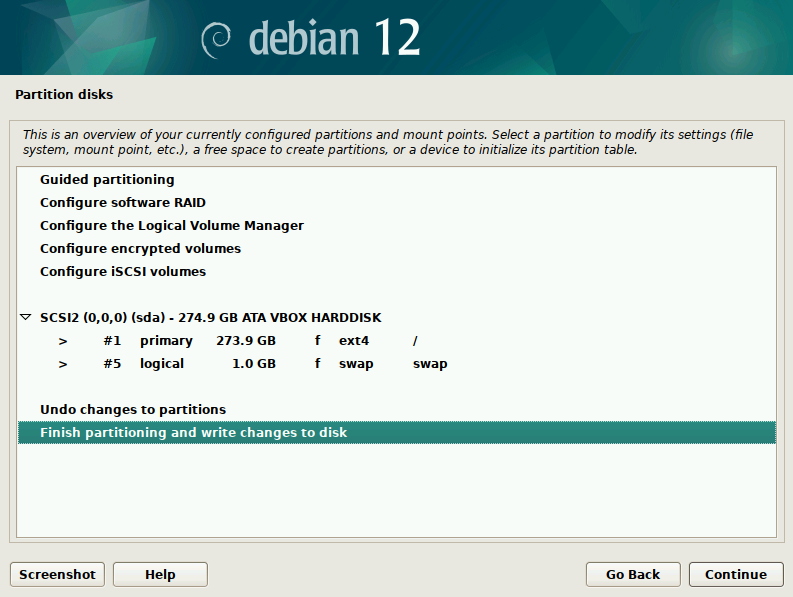
The next screen will be a reconfirmation before the disk is actually Partitioned and old data is erased. Select “Yes” to answer the question “Write the changes to disks?” and click continue. After the Partitioning of the disk, the Installer will copy the base Operating system files (Excluding the GUI Desktop) onto the hard disk. Let it install the base system.
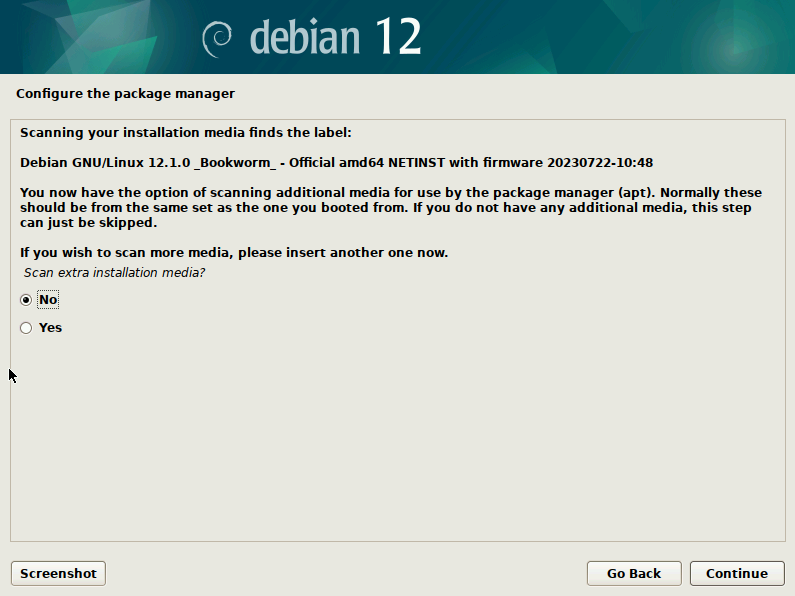
After the base system is installed, Installer will show you a screen for “Configure the package manager” and ask you if you have other downloaded media/CD/DVD for Debian – “Scan extra installation media?”. You can choose no here. Package Manager in Linux is a software utility application that lets you search for and install other software in Linux, once the base OS is installed, but it needs to be configured once. The Default package manager in Debian is called “apt”.
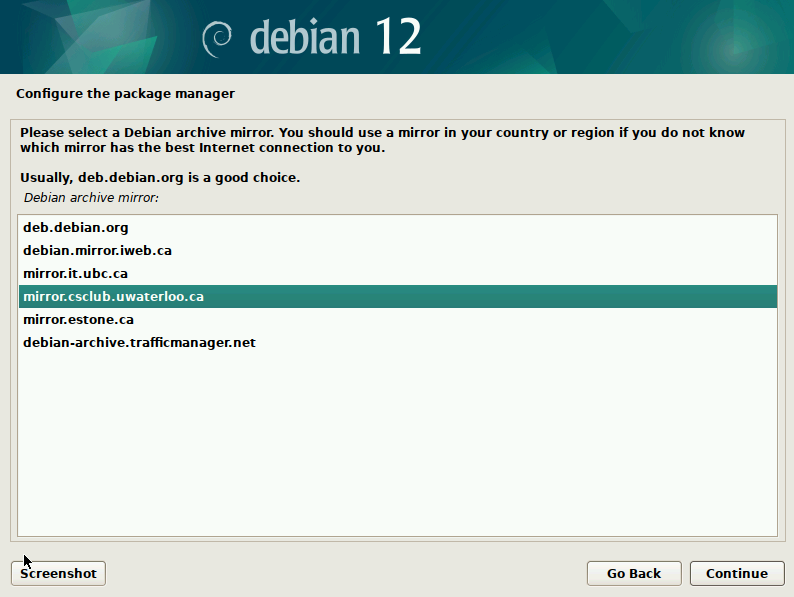
On the next screen of “Configure the package manager” it will ask you to choose “Debian archive mirror country:”. Here you should choose a country name close to your location. Then on the next screen it will ask you to choose “Debian archive mirror:”. The choice actually makes little difference. I will choose University of Waterloo – CS Club Mirror, since it is pretty close to my location.
In the next screen, it will ask for “HTTP proxy information (blank for none):”. Usually it should be left empty and click continue.
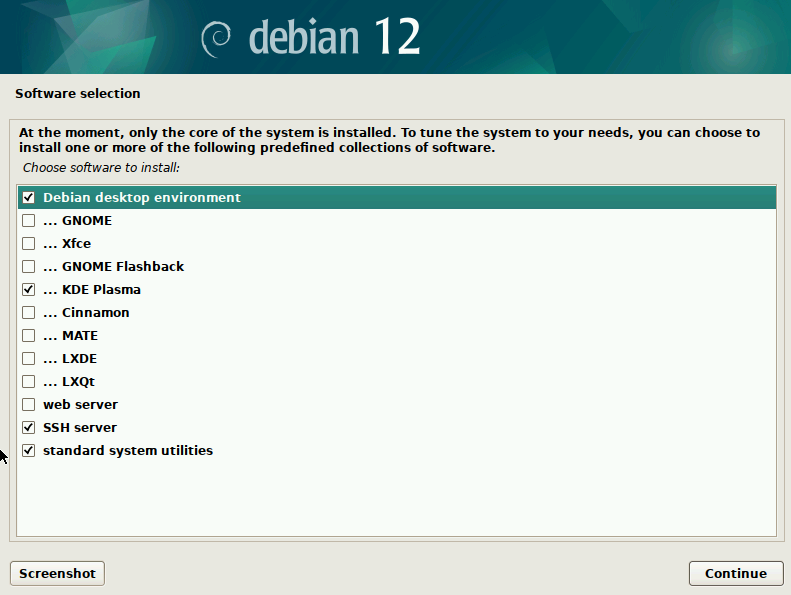
The next screen of the Installer asks you if you wish to “Participate in the package usage survey”. A Package in Debian is a software that can be downloaded and installed using Package Manager. You can choose Yes or No. I will choose “No” for now. The next screen is for selecting the Software to be added to your base OS installation. This screen is titled “Software Selection”. Here you can choose if you want to install the any GUI Desktop systems like:
- GNOME,
- Xfce,
- GNOME Flashback,
- KDE Plasma,
- Cinnamon,
- MATE,
- LXDE and,
- LXQt.
The Default selected option is GNOME but I feel more comfortable with Microsoft Windows Styled – KDE Plasma or Cinnamon. You may also choose a light weight LXDE or LXQt, which will give you a GUI and not consume too much hard disk space. If you are comfortable with Command Line only OS, then you may uncheck “Debian desktop environment” and uncheck all Desktop software from this list – GNOME, Xfce, GNOME Flashback, KDE Plasma, Cinnamon, MATE, LXDE and LXQt. I will like to install KDE Plasma for this tutorial. One additional software I choose from this list is “SSH Server”. I will be installing a Web Server also but not in this screen. My final choices look like below screen.
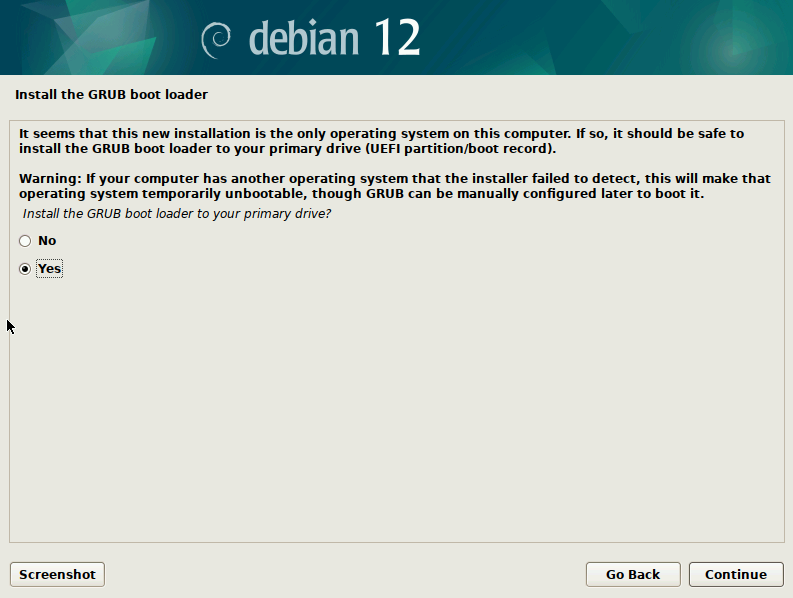
The Installer will then Download the selected software and install it. It may take several minutes, depending on your network speed. Once done, the next screen will be titled “Install the GRUB boot loader”. It is recommended to install this piece of software, otherwise your computer may fail to boot.
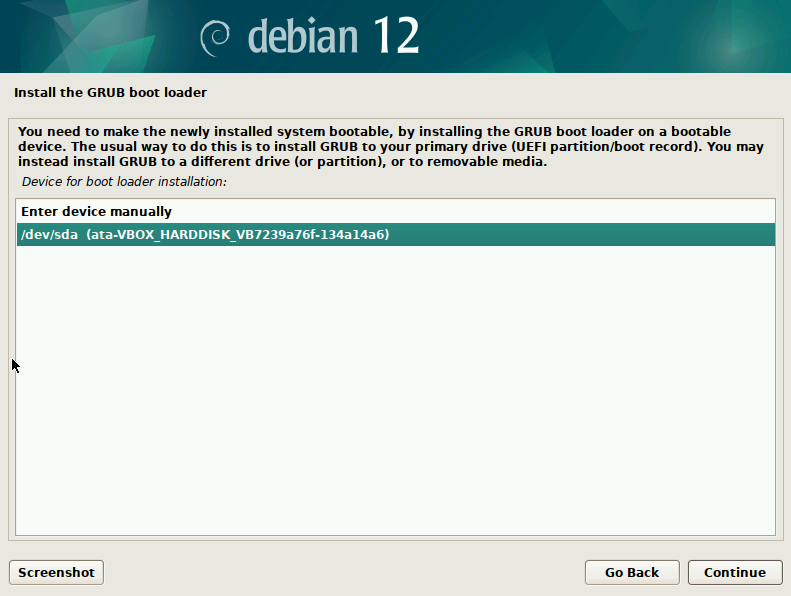
On the next screen choose “Device for boot loader installation”. Click on your primary hard disk.
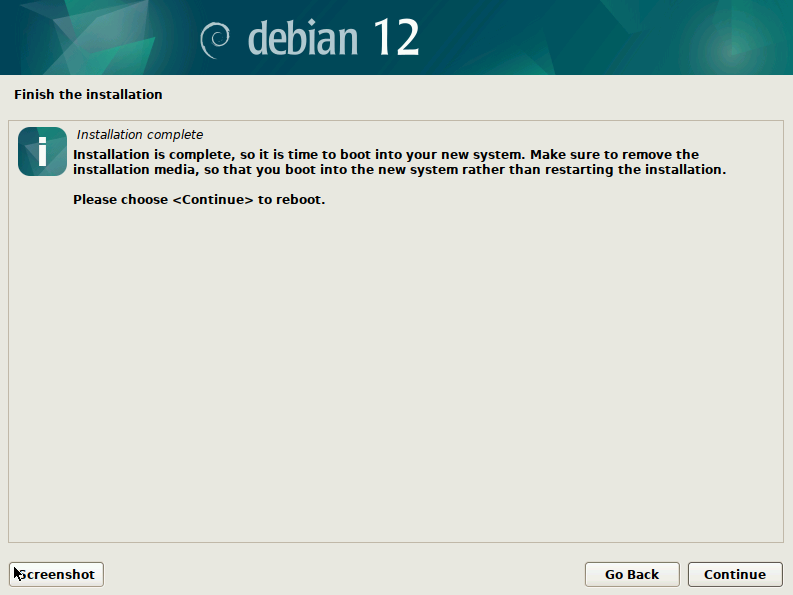
That is it. You OS has been installed. The last screen advises you to remove the installation media (USB Thumb Drive or DVD) and then reboot the computer.
After reboot, if you let it boot automatically you should see a screen similar to the following after all boot steps are completed.
Static Fixed IP Address
Login to the target hardware. For this first session and the commands given in this section, make sure that you are actually logged in to the target computer via keyboard and Display Monitor and not via SSH connection.
Add user01 to sudo Group (CLI and GUI – KDE Plasma Installation)
First we will add the default user account “user01” into “sudo” group, so that we can run Root privileged commands easily. Start a Terminal session.
In the Terminal session command line, first add the user to SUDO group by typing the following commands:
$ su -
Password: (enter here the password of the root user that you specified during your Debian installation, and press Enter)

# apt install sudo

# adduser user01 sudo

# exit

$ exit
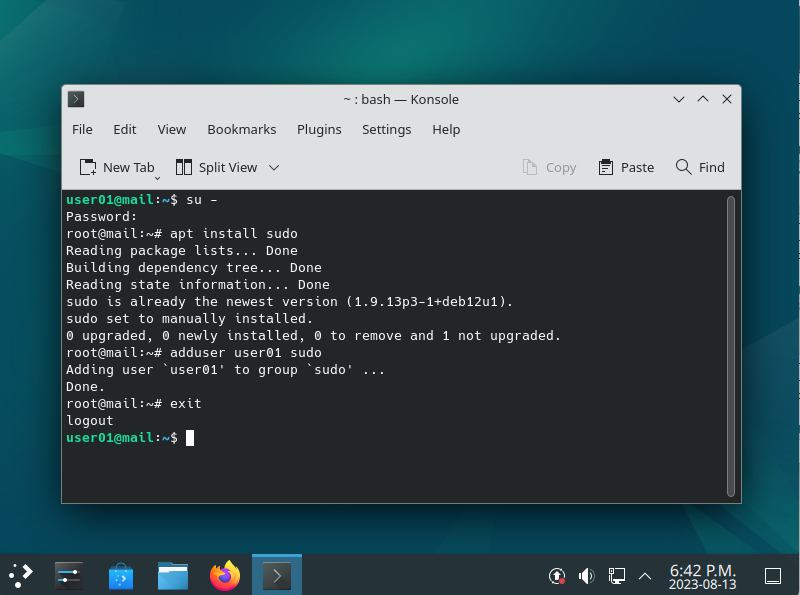
You have to exit (end the Terminal session) and log-out of the Server once, for changes to take effect. Login again and start a new Terminal session again, this time user01 will be member of sudo group. We will also add a NO-PASSWORD directive in the “/etc/sudoers” file so that we are not prompted for password every time we use the “sudo” prefix. Type the following command in the new Terminal session.
$ sudo nano /etc/sudoers
[sudo] password for user01: (Enter the password for user01 you entered during installation and login)
Nano text editor will open, scroll down to near the bottom of the file and update the 2 lines as shown in the below screen shot. What we have done is comment out one line and added another one in its place.
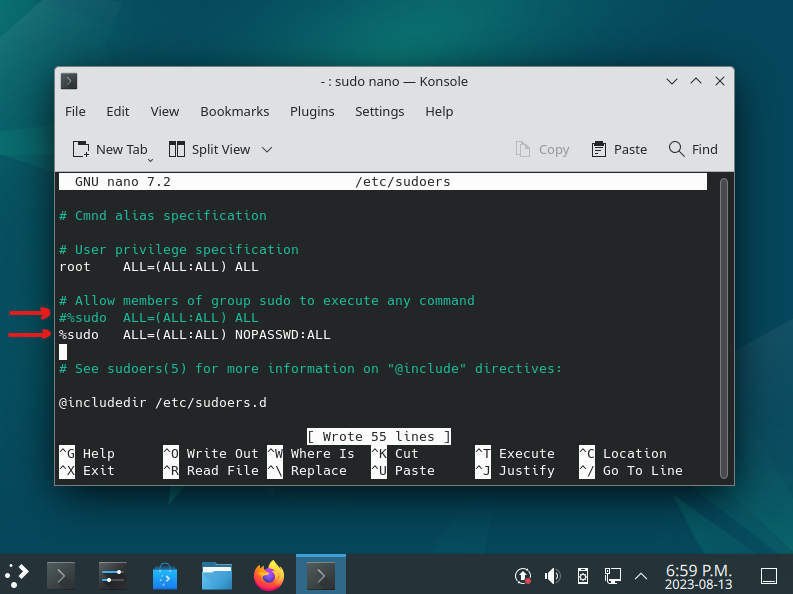
Press CTRL+O to write the changes to disk, then press CTRL+X to exit Nano editor. You now need to log off one more time. Then log in again for SUDO changes to take effect.
Assign Fixed Static IP (GUI – KDE Plasma Installation)
Before assigning a fixed IP to the target computer make sure your Internet Router DHCP settings (DHCP is the system that assigns automatic IP addresses to devices on your local network), are set to issue IP Addresses in a range that allows fixed IP address outside that range. For example: DHCP range can be from 192.168.0.40 to 192.168.0.250, this leaves the range 192.168.0.2 to 192.168.0.39 for fixed IP addresses.
Open a terminal session. In a GUI Desktop (KDE plasma) based installation of Debian 12, Network connections are managed by Network Manager, which has a nice GUI Interface for changing IP addresses. But we can also set a static IP using Network Manager CLI “nmcli” utility. Over here I will document how use “nmcli” to set static IP address. Type the following commands to list the Network Connections:
$ nmcli connection show
You will see output showing you the connections. Important thing to note here is the NAME of the ethernet connection.
user01@mail:~$ nmcli connection show
NAME                UUID                                  TYPE      DEVICE
Wired connection 1  f01afddc-9c89-40c4-b95e-6ad9d8888e02  ethernet  enp0s3
lo                  4ba750cf-38e5-4a1e-b45d-fd423458125a  loopback  lo
user01@mail:~$
You can also check the current status of the connection with the following:
$ nmcli dev status
$ nmcli con mod 'Wired connection 1' ipv4.address 192.168.0.6/24
$ nmcli con mod 'Wired connection 1' ipv4.gateway 192.168.0.1
$ nmcli con mod 'Wired connection 1' ipv4.dns "8.8.8.8"
$ nmcli con mod 'Wired connection 1' ipv4.method manual
$ nmcli con up 'Wired connection 1'
$ ip addr
A complete session showing the all the commands you need to set static IP Address is given below. Your input commands are highlighted:
user01@mail:~$ nmcli dev status
DEVICE  TYPE      STATE                   CONNECTION
enp0s3  ethernet  connected               Wired connection 1
lo      loopback  connected (externally)  lo

user01@mail:~$ ip addr
1: lo: <LOOPBACK,UP,LOWER_UP> mtu 65536 qdisc noqueue state UNKNOWN group default qlen 1000
    link/loopback 00:00:00:00:00:00 brd 00:00:00:00:00:00
    inet 127.0.0.1/8 scope host lo
       valid_lft forever preferred_lft forever
    inet6 ::1/128 scope host noprefixroute
       valid_lft forever preferred_lft forever
2: enp0s3: <BROADCAST,MULTICAST,UP,LOWER_UP> mtu 1500 qdisc fq_codel state UP group default qlen 1000
    link/ether 08:00:27:be:f6:58 brd ff:ff:ff:ff:ff:ff
    inet 192.168.0.192/24 brd 192.168.0.255 scope global dynamic noprefixroute enp0s3
       valid_lft 3121sec preferred_lft 3121sec
    inet6 fe80::a00:27ff:febe:f658/64 scope link noprefixroute
       valid_lft forever preferred_lft forever


user01@mail:~$ nmcli con mod 'Wired connection 1' ipv4.address 192.168.0.6/24
user01@mail:~$ nmcli con mod 'Wired connection 1' ipv4.gateway 192.168.0.1
user01@mail:~$ nmcli con mod 'Wired connection 1' ipv4.dns "8.8.8.8"
user01@mail:~$ nmcli con mod 'Wired connection 1' ipv4.method manual


user01@mail:~$ nmcli con up 'Wired connection 1'
Connection successfully activated (D-Bus active path: /org/freedesktop/NetworkManager/ActiveConnection/3)


user01@mail:~$ ip addr
1: lo: <LOOPBACK,UP,LOWER_UP> mtu 65536 qdisc noqueue state UNKNOWN group default qlen 1000
    link/loopback 00:00:00:00:00:00 brd 00:00:00:00:00:00
    inet 127.0.0.1/8 scope host lo
       valid_lft forever preferred_lft forever
    inet6 ::1/128 scope host noprefixroute
       valid_lft forever preferred_lft forever
2: enp0s3: <BROADCAST,MULTICAST,UP,LOWER_UP> mtu 1500 qdisc fq_codel state UP group default qlen 1000
    link/ether 08:00:27:be:f6:58 brd ff:ff:ff:ff:ff:ff
    inet 192.168.0.6/24 brd 192.168.0.255 scope global noprefixroute enp0s3
       valid_lft forever preferred_lft forever
    inet6 fe80::a00:27ff:febe:f658/64 scope link noprefixroute
       valid_lft forever preferred_lft forever
user01@mail:~$
Assign Fixed Static IP (CLI Installation)
On Command Line Installation of Debian 12 there is no Network Manager application, but the ordinary Networking Service only. So the commands in the CLI setup will be as follows:
$ ip address
$ ip -c link show
$ sudo ls -l /etc/network/interfaces
$ sudo cat /etc/network/interfaces
$ sudo nano /etc/network/interfaces
{ Comment out the line.....#iface enp0s3 inet dhcp
And add the following lines.......
iface enp0s3 inet static
address 192.168.0.7    (Or choose what ever static IP address you want in your LAN)
netmask 255.255.255.0
gateway 192.168.0.1
dns-nameservers 8.8.8.8
}
$ sudo systemctl restart networking
$ ip address
When typed on an interactive session, the session can look like follows:
user01@mail:~$ ip address
1: lo: <LOOPBACK,UP,LOWER_UP> mtu 65536 qdisc noqueue state UNKNOWN group default qlen 1000
    link/loopback 00:00:00:00:00:00 brd 00:00:00:00:00:00
    inet 127.0.0.1/8 scope host lo
       valid_lft forever preferred_lft forever
    inet6 ::1/128 scope host noprefixroute
       valid_lft forever preferred_lft forever
2: enp0s3: <BROADCAST,MULTICAST,UP,LOWER_UP> mtu 1500 qdisc fq_codel state UP group default qlen 1000
    link/ether 08:00:27:93:7b:1f brd ff:ff:ff:ff:ff:ff
    inet 192.168.0.193/24 brd 192.168.0.255 scope global dynamic enp0s3
       valid_lft 3263sec preferred_lft 3263sec
    inet6 fe80::a00:27ff:fe93:7b1f/64 scope link
       valid_lft forever preferred_lft forever

user01@mail:~$ ip -c link show
1: lo: <LOOPBACK,UP,LOWER_UP> mtu 65536 qdisc noqueue state UNKNOWN mode DEFAULT group default qlen 1000
    link/loopback 00:00:00:00:00:00 brd 00:00:00:00:00:00
2: enp0s3: <BROADCAST,MULTICAST,UP,LOWER_UP> mtu 1500 qdisc fq_codel state UP mode DEFAULT group default qlen 1000
    link/ether 08:00:27:93:7b:1f brd ff:ff:ff:ff:ff:ff
user01@mail:~$ ip -c address show enp0s3
2: enp0s3: <BROADCAST,MULTICAST,UP,LOWER_UP> mtu 1500 qdisc fq_codel state UP group default qlen 1000
    link/ether 08:00:27:93:7b:1f brd ff:ff:ff:ff:ff:ff
    inet 192.168.0.193/24 brd 192.168.0.255 scope global dynamic enp0s3
       valid_lft 3130sec preferred_lft 3130sec
    inet6 fe80::a00:27ff:fe93:7b1f/64 scope link
       valid_lft forever preferred_lft forever

user01@mail:~$ sudo ls -l /etc/network/interfaces
-rw-r--r-- 1 root root 317 Aug 13 20:53 /etc/network/interfaces

user01@mail:~$ sudo cat /etc/network/interfaces
# This file describes the network interfaces available on your system
# and how to activate them. For more information, see interfaces(5).

source /etc/network/interfaces.d/*

# The loopback network interface
auto lo
iface lo inet loopback

# The primary network interface
allow-hotplug enp0s3
iface enp0s3 inet dhcp


user01@mail:~$ sudo nano /etc/network/interfaces
user01@mail:~$ sudo cat /etc/network/interfaces
# This file describes the network interfaces available on your system
# and how to activate them. For more information, see interfaces(5).

source /etc/network/interfaces.d/*

# The loopback network interface
auto lo
iface lo inet loopback

# The primary network interface
allow-hotplug enp0s3
#iface enp0s3 inet dhcp
iface enp0s3 inet static
address 192.168.0.7
netmask 255.255.255.0
gateway 192.168.0.1
dns-nameservers 8.8.8.8

user01@mail:~$ sudo systemctl restart networking


user01@mail:~$ ip address
1: lo: <LOOPBACK,UP,LOWER_UP> mtu 65536 qdisc noqueue state UNKNOWN group default qlen 1000
    link/loopback 00:00:00:00:00:00 brd 00:00:00:00:00:00
    inet 127.0.0.1/8 scope host lo
       valid_lft forever preferred_lft forever
    inet6 ::1/128 scope host noprefixroute
       valid_lft forever preferred_lft forever
2: enp0s3: <BROADCAST,MULTICAST,UP,LOWER_UP> mtu 1500 qdisc fq_codel state UP group default qlen 1000
    link/ether 08:00:27:93:7b:1f brd ff:ff:ff:ff:ff:ff
    inet 192.168.0.7/24 brd 192.168.0.255 scope global enp0s3
       valid_lft forever preferred_lft forever
    inet6 fe80::a00:27ff:fe93:7b1f/64 scope link
       valid_lft forever preferred_lft forever

user01@mail:~$
Disable IPv6 (GUI – KDE Plasma Installation)
$ nmcli connection show
$ ip address show enp0s3
$ nmcli connection modify 'Wired connection 1' ipv6.method "disabled"
$ nmcli connection up 'Wired connection 1'
$ ip address show enp0s3
When type in the terminal session the output looks like that shown below:

Set DNS Servers in /etc/resolv.conf
Depending on your setup you may need to edit /etc/resolve.conf file to look like the following:
user01@mail:~$ sudo cat /etc/resolv.conf
nameserver 192.168.0.1
nameserver 8.8.8.8

user01@mail:~$
Disable IPv6 (CLI Installation)
On Command Line Installation of Debian 12 there is no Network Manager, so the method of disabling IPv6 is also different than GUI version. Use the following commands to disable IPv6 on the CLI installation of Debian 12:
$ ip address
$ sudo ls -l /etc/sysctl.conf
$ sudo cat /etc/sysctl.conf

$ sudo nano /etc/sysctl.conf
{ Add the following lines at the bottom of the file .........
net.ipv6.conf.all.disable_ipv6 = 1
net.ipv6.conf.default.disable_ipv6 = 1
net.ipv6.conf.lo.disable_ipv6 = 1
net.ipv6.conf.tun0.disable_ipv6 = 1
}

$ sudo cat /etc/sysctl.conf
$ sudo reboot -h now
.....
$ ip address
On an interactive session these commands can look like follows:
user01@mail:~$ ip address
1: lo: <LOOPBACK,UP,LOWER_UP> mtu 65536 qdisc noqueue state UNKNOWN group default qlen 1000
    link/loopback 00:00:00:00:00:00 brd 00:00:00:00:00:00
    inet 127.0.0.1/8 scope host lo
       valid_lft forever preferred_lft forever
    inet6 ::1/128 scope host noprefixroute
       valid_lft forever preferred_lft forever
2: enp0s3: <BROADCAST,MULTICAST,UP,LOWER_UP> mtu 1500 qdisc fq_codel state UP group default qlen 1000
    link/ether 08:00:27:93:7b:1f brd ff:ff:ff:ff:ff:ff
    inet 192.168.0.7/24 brd 192.168.0.255 scope global enp0s3
       valid_lft forever preferred_lft forever
    inet6 fe80::a00:27ff:fe93:7b1f/64 scope link
       valid_lft forever preferred_lft forever

user01@mail:~$ sudo ls -l /etc/sysctl.conf
-rw-r--r-- 1 root root 2355 Dec 19  2022 /etc/sysctl.conf

user01@mail:~$ sudo cat /etc/sysctl.conf
#
# /etc/sysctl.conf - Configuration file for setting system variables
# See /etc/sysctl.d/ for additional system variables.
# See sysctl.conf (5) for information.
#

#kernel.domainname = example.com

# Uncomment the following to stop low-level messages on console
#kernel.printk = 3 4 1 3

###################################################################
# Functions previously found in netbase
#

# Uncomment the next two lines to enable Spoof protection (reverse-path filter)
# Turn on Source Address Verification in all interfaces to
# prevent some spoofing attacks
#net.ipv4.conf.default.rp_filter=1
#net.ipv4.conf.all.rp_filter=1

# Uncomment the next line to enable TCP/IP SYN cookies
# See http://lwn.net/Articles/277146/
# Note: This may impact IPv6 TCP sessions too
#net.ipv4.tcp_syncookies=1

# Uncomment the next line to enable packet forwarding for IPv4
#net.ipv4.ip_forward=1

# Uncomment the next line to enable packet forwarding for IPv6
#  Enabling this option disables Stateless Address Autoconfiguration
#  based on Router Advertisements for this host
#net.ipv6.conf.all.forwarding=1


###################################################################
# Additional settings - these settings can improve the network
# security of the host and prevent against some network attacks
# including spoofing attacks and man in the middle attacks through
# redirection. Some network environments, however, require that these
# settings are disabled so review and enable them as needed.
#
# Do not accept ICMP redirects (prevent MITM attacks)
#net.ipv4.conf.all.accept_redirects = 0
#net.ipv6.conf.all.accept_redirects = 0
# _or_
# Accept ICMP redirects only for gateways listed in our default
# gateway list (enabled by default)
# net.ipv4.conf.all.secure_redirects = 1
#
# Do not send ICMP redirects (we are not a router)
#net.ipv4.conf.all.send_redirects = 0
#
# Do not accept IP source route packets (we are not a router)
#net.ipv4.conf.all.accept_source_route = 0
#net.ipv6.conf.all.accept_source_route = 0
#
# Log Martian Packets
#net.ipv4.conf.all.log_martians = 1
#

###################################################################
# Magic system request Key
# 0=disable, 1=enable all, >1 bitmask of sysrq functions
# See https://www.kernel.org/doc/html/latest/admin-guide/sysrq.html
# for what other values do
#kernel.sysrq=438


user01@mail:~$ sudo nano /etc/sysctl.conf
user01@mail:~$ sudo cat /etc/sysctl.conf
#
# /etc/sysctl.conf - Configuration file for setting system variables
# See /etc/sysctl.d/ for additional system variables.
# See sysctl.conf (5) for information.
#

#kernel.domainname = example.com

# Uncomment the following to stop low-level messages on console
#kernel.printk = 3 4 1 3

###################################################################
# Functions previously found in netbase
#

# Uncomment the next two lines to enable Spoof protection (reverse-path filter)
# Turn on Source Address Verification in all interfaces to
# prevent some spoofing attacks
#net.ipv4.conf.default.rp_filter=1
#net.ipv4.conf.all.rp_filter=1

# Uncomment the next line to enable TCP/IP SYN cookies
# See http://lwn.net/Articles/277146/
# Note: This may impact IPv6 TCP sessions too
#net.ipv4.tcp_syncookies=1

# Uncomment the next line to enable packet forwarding for IPv4
#net.ipv4.ip_forward=1

# Uncomment the next line to enable packet forwarding for IPv6
#  Enabling this option disables Stateless Address Autoconfiguration
#  based on Router Advertisements for this host
#net.ipv6.conf.all.forwarding=1


###################################################################
# Additional settings - these settings can improve the network
# security of the host and prevent against some network attacks
# including spoofing attacks and man in the middle attacks through
# redirection. Some network environments, however, require that these
# settings are disabled so review and enable them as needed.
#
# Do not accept ICMP redirects (prevent MITM attacks)
#net.ipv4.conf.all.accept_redirects = 0
#net.ipv6.conf.all.accept_redirects = 0
# _or_
# Accept ICMP redirects only for gateways listed in our default
# gateway list (enabled by default)
# net.ipv4.conf.all.secure_redirects = 1
#
# Do not send ICMP redirects (we are not a router)
#net.ipv4.conf.all.send_redirects = 0
#
# Do not accept IP source route packets (we are not a router)
#net.ipv4.conf.all.accept_source_route = 0
#net.ipv6.conf.all.accept_source_route = 0
#
# Log Martian Packets
#net.ipv4.conf.all.log_martians = 1
#

###################################################################
# Magic system request Key
# 0=disable, 1=enable all, >1 bitmask of sysrq functions
# See https://www.kernel.org/doc/html/latest/admin-guide/sysrq.html
# for what other values do
#kernel.sysrq=438

net.ipv6.conf.all.disable_ipv6 = 1
net.ipv6.conf.default.disable_ipv6 = 1
net.ipv6.conf.lo.disable_ipv6 = 1
net.ipv6.conf.tun0.disable_ipv6 = 1


user01@mail:~$ sudo reboot -h now

.....


user01@mail:~$ ip address
1: lo: <LOOPBACK,UP,LOWER_UP> mtu 65536 qdisc noqueue state UNKNOWN group default qlen 1000
    link/loopback 00:00:00:00:00:00 brd 00:00:00:00:00:00
    inet 127.0.0.1/8 scope host lo
       valid_lft forever preferred_lft forever
2: enp0s3: <BROADCAST,MULTICAST,UP,LOWER_UP> mtu 1500 qdisc fq_codel state UP group default qlen 1000
    link/ether 08:00:27:93:7b:1f brd ff:ff:ff:ff:ff:ff
    inet 192.168.0.7/24 brd 192.168.0.255 scope global enp0s3
       valid_lft forever preferred_lft forever


user01@mail:~$ ip -c address show enp0s3
2: enp0s3: <BROADCAST,MULTICAST,UP,LOWER_UP> mtu 1500 qdisc fq_codel state UP group default qlen 1000
    link/ether 08:00:27:93:7b:1f brd ff:ff:ff:ff:ff:ff
    inet 192.168.0.7/24 brd 192.168.0.255 scope global enp0s3
       valid_lft forever preferred_lft forever
user01@mail:~$
Dynamic DNS Update Client Software
Dynamic DNS Provider service works best with either a Router based DDNS Update client or a target Computer installed DDNS client. In this article we will be installing Dynu.com’s DDNS Client on our target computer.
To install the DDNS Update Client Software for Dynu.com we will use the following commands:
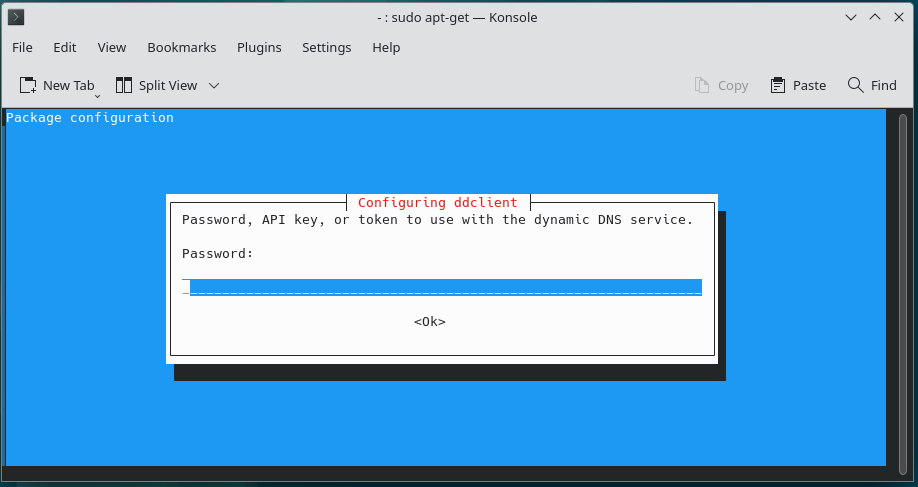
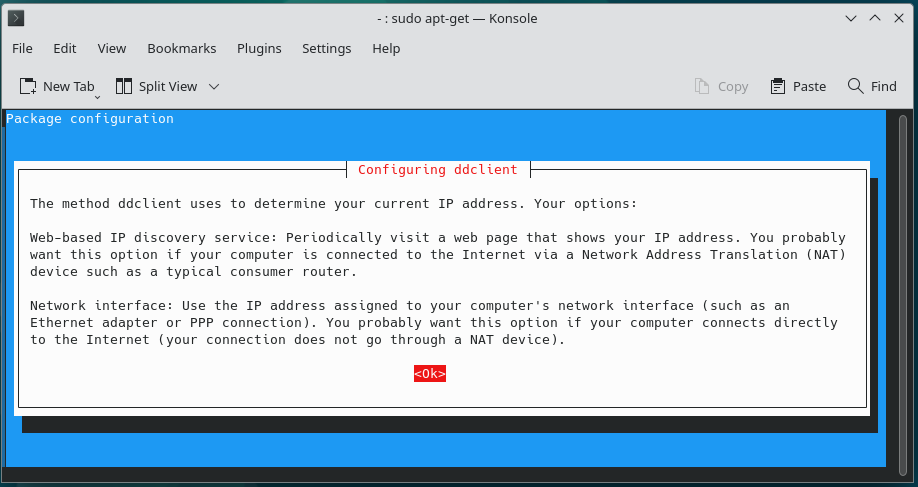
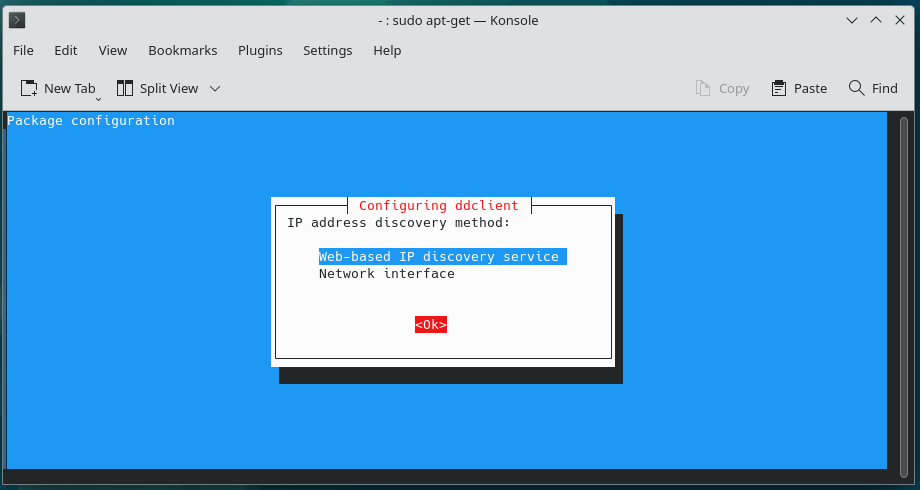
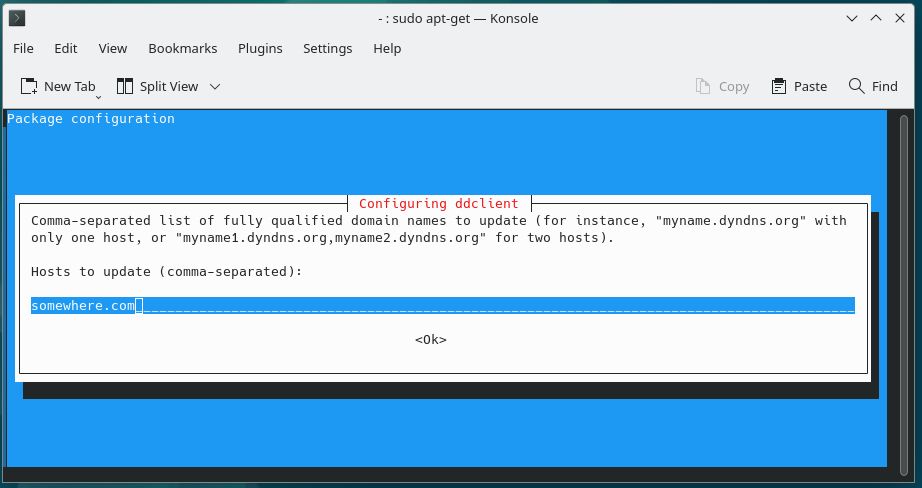
$ sudo apt-get install -y ddclient
(Complete interactive configuration with default choices)

$ sudo systemctl status ddclient
$ sudo ls -l /etc/ddclient.conf
$ sudo cat /etc/ddclient.conf
(Examine the contents of Default configuration)


$ sudo cp /etc/ddclient.conf /etc/ddclient.conf_original
$ sudo nano /etc/ddclient.conf
(Modify the default configuration, as per your particulars)
$ sudo cat /etc/ddclient.conf
(Examine the modified configuration)


$ sudo systemctl stop ddclient
$ sudo systemctl start ddclient
$ sudo systemctl status ddclient
$ sudo journalctl -u ddclient -f
(Press CTRL+C to stop following journalctl logs)

(Each of the above sections is further described in detail below).
Interactive Configuration with default choices can look like following screen shots (Screen shots from GUI – KDE Plasma Desktop, CLI screens shots will be quite similar):
1.
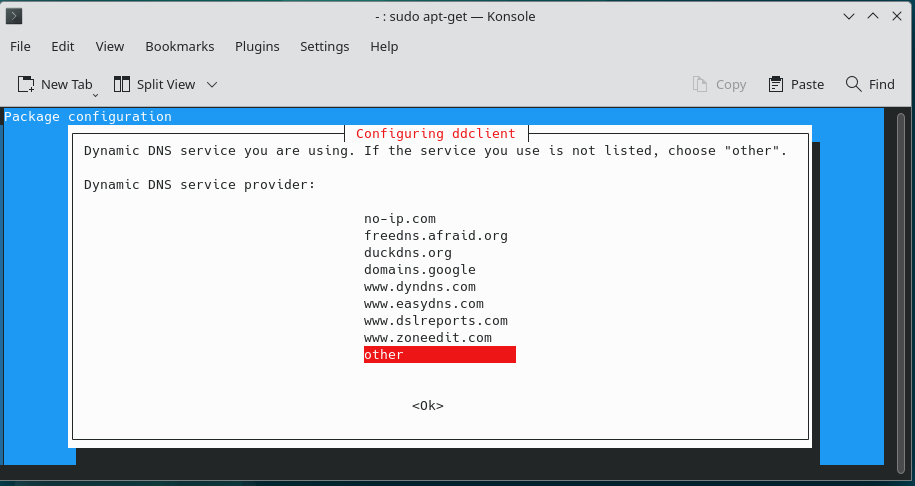
2.
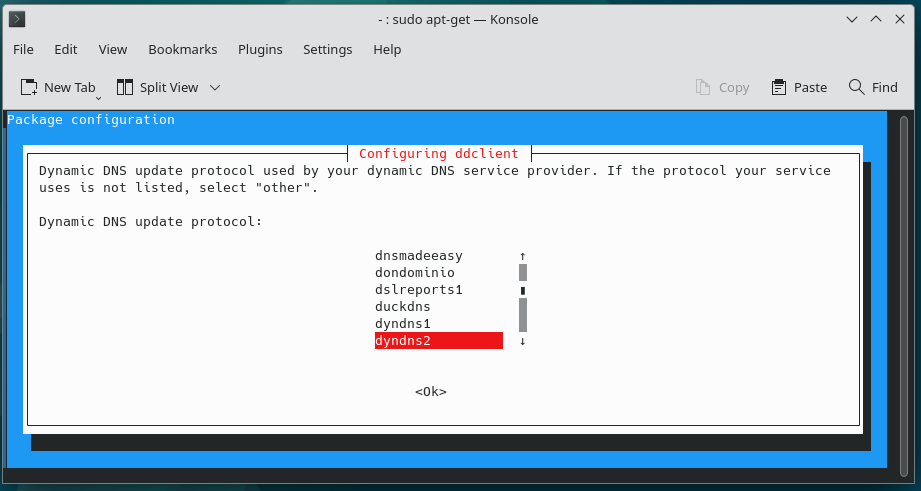
3.
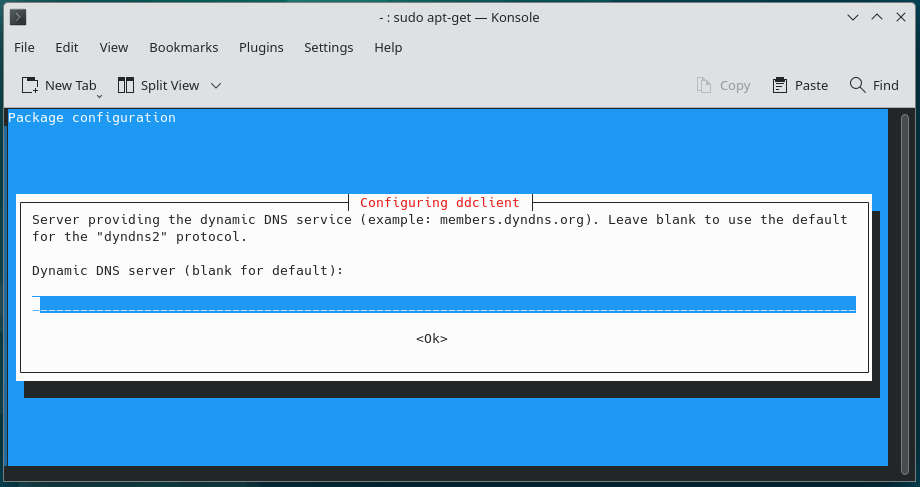
4.
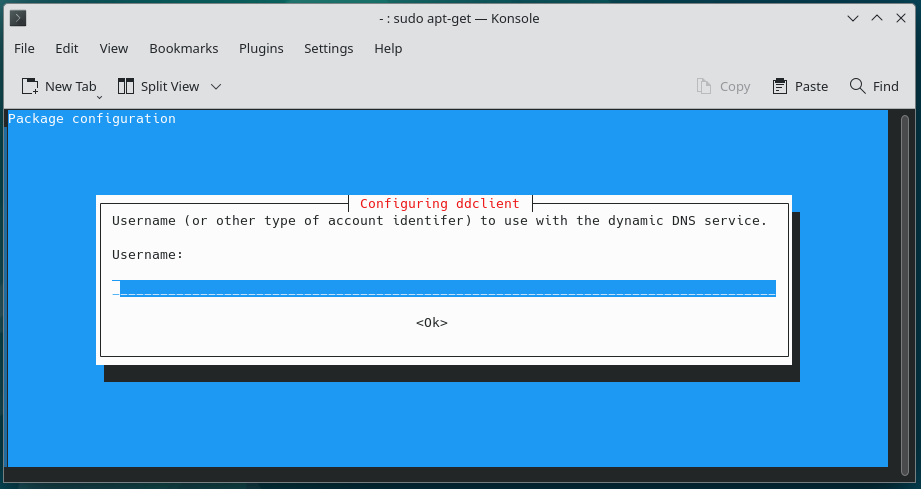
5.
6.
7.
8.
After Default configuration with default values “/etc/ddclient.conf” file can look like following:
$ sudo cat /etc/ddclient.conf

# Configuration file for ddclient generated by debconf
#
# /etc/ddclient.conf

protocol=dyndns2 \
use=web, web=ipify-ipv4 \
login= \
password='' \
somewhere.com
Then when we edit the file with ‘nano’ editor to introduce dynu.com’s user account details, it can look like following:
$ sudo cat /etc/ddclient.conf

# /etc/ddclient.conf
daemon=900                                      # Check every 900 seconds (15 minutes).
syslog=yes                                      # Log update msgs to syslog.
mail=root                                       # Mail all msgs to root.
mail-failure=root                               # Mail failed update msgs to root.
pid=/var/run/ddclient.pid                       # Record PID in file.
ssl=yes                                         # Use ssl-support.  Works with ssl-library .
#use=if, if=eth0                                 # Get ip from hardware interface.
use=web, web=checkip.dynu.com/, web=ipify-ipv4
server=api.dynu.com                             # IP update server.
protocol=dyndns2
login=YOUR-REGISTERED-USERNAME_AT-DYNU.COM
password='YOUR-PASSWORD'
somewhere.com
mail.somewhere.com
“ddclient” default settings are stored at /etc/default/ddclient. You can edit it with the following command:
$ sudo nano /etc/default/ddclient
The “daemon_interval” value has been modified to “15m” for 15 minutes. After edit this file contents look like following:
# Configuration for ddclient scripts
# generated from debconf on Tue 01 Aug 2023 02:27:09 PM EDT
#
# /etc/default/ddclient

# Set to "true" if ddclient should be run every time DHCP client ('dhclient'
# from package isc-dhcp-client) updates the systems IP address.
run_dhclient="false"

# Set to "true" if ddclient should be run every time a new ppp connection is
# established. This might be useful, if you are using dial-on-demand.
run_ipup="false"

# Set the time interval between the updates of the dynamic DNS name in seconds.
# This option only takes effect if the ddclient runs in daemon mode.
daemon_interval="15m"
Then you can restart the DDNS Client software as follows:
$ sudo systemctl stop ddclient
$ sudo systemctl start ddclient
To examine “ddclient’ logs use the following command:
$ sudo journalctl -u ddclient -f

(Press CTRL+C to stop following the logs)
Port Forwarding on Home Router
This setting will be done in a slightly different way for each Internet Service Provider (ISP) because they all use different routers/gateway devices. But the important thing is that the following ports be opened. Note that these ports will be enabled in later sections, when we install Apache, enable SSL, and when we install Postfix and Dovecot.
| Name | Status | Protocols | Internal port | External port | Local IP address / Device name | Description |
|---|---|---|---|---|---|---|
| HTTP | Enabled | TCP | 80 | 80 | 192.168.0.6 ( or Target Server Host-Name) | |
| HTTPS | Enabled | TCP | 443 | 443 | 192.168.0.6 ( or Target Server Host-Name) | |
| Postfix-SMTP | Enabled | TCP | 25 | 25 | 192.168.0.6 ( or Target Server Host-Name) | |
| Postfix-SMTPS | Enabled | TCP | 465 | 465 | 192.168.0.6 ( or Target Server Host-Name) | |
| Postfix-MSA | Enabled | TCP | 587 | 587 | 192.168.0.6 ( or Target Server Host-Name) | Mail Submission Agent |
| Postfix-SMTP | Enabled | TCP | 2525 | 2525 | 192.168.0.6 ( or Target Server Host-Name) | |
| IMAP-login | Enabled | TCP | 143 | 143 | 192.168.0.6 ( or Target Server Host-Name) | |
| dovecot-POP3 | Enabled | TCP | 110 | 110 | 192.168.0.6 ( or Target Server Host-Name) | |
| IMAP-login | Enabled | TCP | 993 | 993 | 192.168.0.6 ( or Target Server Host-Name) | |
| dovecot-POP3 | Enabled | TCP | 995 | 995 | 192.168.0.6 ( or Target Server Host-Name) |
Installation of Apache Web Server
You may be wondering, why we are installing Web Server when we actually only need an email-server. The primary reason is that email-server uses SSL certificates to assert its identity to other servers on the internet (including your e-mail relay, and other public email servers like yahoo.com, gmail.com, outlook.com etc.). We will be using “Let’s Encrypt” SSL Certificates, that are free and are renewed automatically. “Let’s Encrypt” renewal software robot (bot) needs a web server. Another benefit of having the Web server is that we can install a Web Application like WordPress, or Joomla. However, please note that in this article we will just use a simple HTML page as a placeholder and only content of the website.
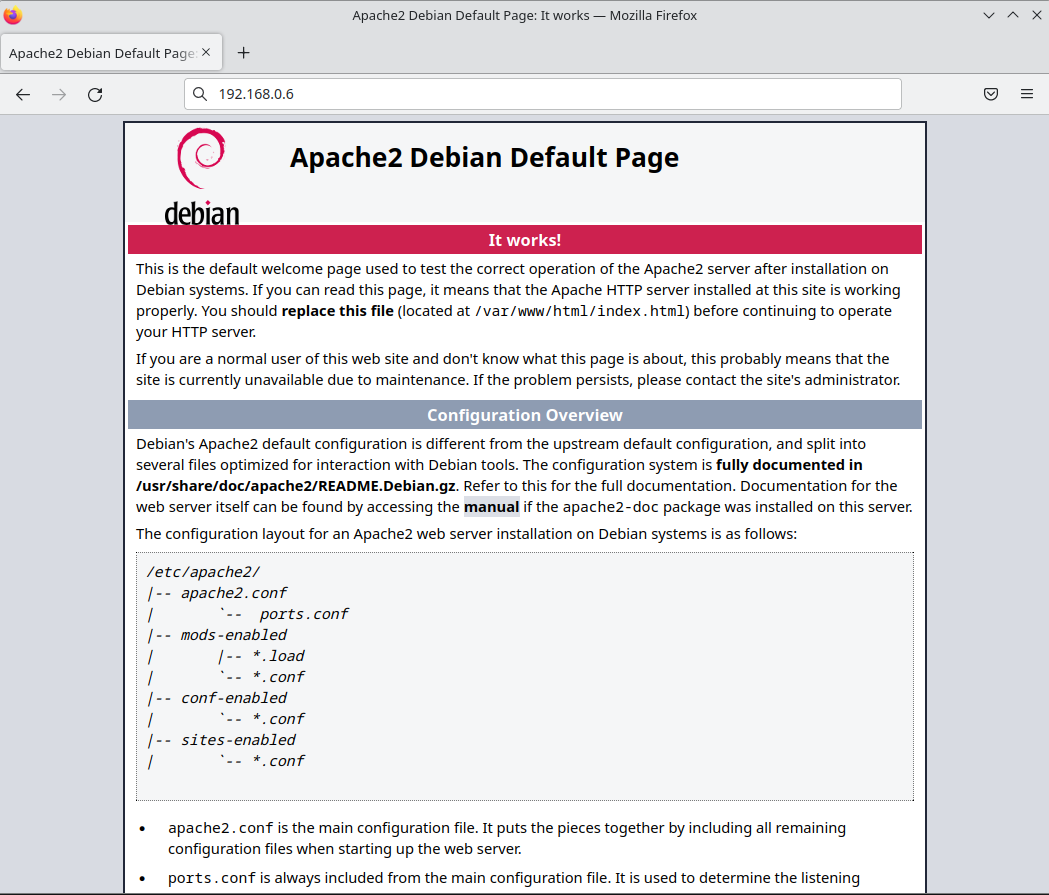
Installation of Apache Web Server in Debian is really very simple. After completing this section you will have the default Apache page visible on port 80 of your Target Server. Since you have already setup port forwarding (in a previous section), the web page should also be visible from outside your home.
To install the Apache web server simply type the following command.
$ sudo apt install apache2
Once the Apache2 Web server is installed make sure that it is set to auto start on reboot, and start it.
$ sudo systemctl enable apache2
$ sudo systemctl restart apache2
Check that the default Apache page is visible on the following Hyper-links.
| Test URL | Description |
|---|---|
| http://192.168.0.6 Or http://–IP Address of Target Server– | Test URL on your local area network. |
| http://somewhere.com Or http://–Your Domain Name– | Test URL from outside your Local area network. (Use your cell phone, with Wifi turned off, and data enabled). |
Configuration of Website
We will configure the Apache2 web server to serve a plain and simple placeholder page in this post. If required, it can be used to hold a professional looking website like WordPress or Joomla, but we will not be doing that over here.
We already have a simple Default page showing after the installation of Apache2 in the previous section. We will disable that and add our own simple page, in the following steps.
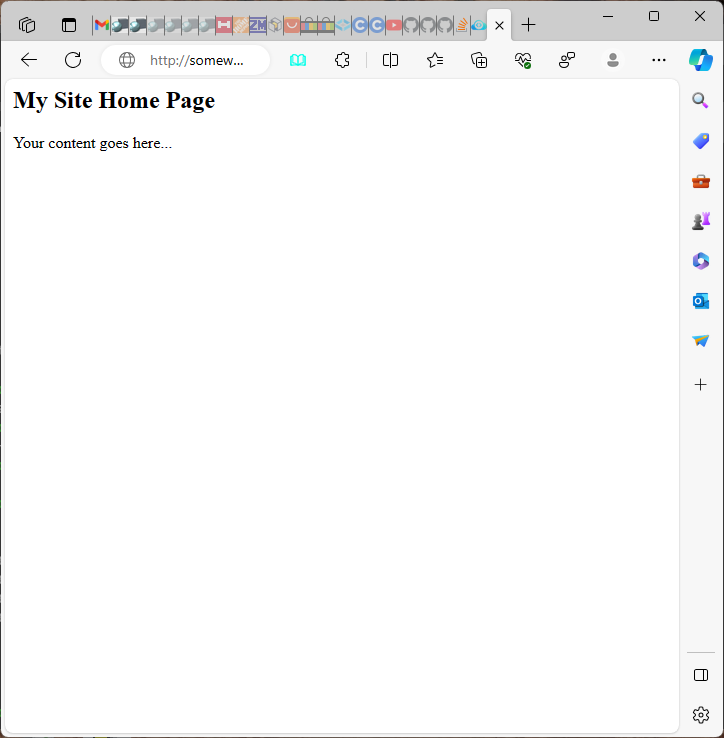
$ cd /var/www/html
$ sudo mv index.html index.html.bak
$ sudo nano index.html
Then in the “nano” editor type or paste the following HTML code.
<html>
<head><title>My Site Home Page</title></head>
<body>
<h2>My Site Home Page</h2>
<p>Your content goes here...</p>
</body>
</html>
Press CTRL+O to save, and CTRL+X to exit nano editor. Then on the bash command prompt type the following to set correct permissions for the /var/www/html folder:
 $ cd /var/www
$ sudo chown -R root:www-data ./html
Now we will change the Apache2 server configuration to disable the default site, and show the new page/site we have saved above. Please type in the following commands.
$ cd /etc/apache2/sites-available
$ sudo nano somewhere.com.conf
Then in the “nano” text editor type/copy-paste the following content:
<VirtualHost somewhere.com:80>
    Protocols http/1.1
    ServerAdmin webmaster@localhost
    ServerName somewhere.com
    DocumentRoot /var/www/html

    ErrorLog ${APACHE_LOG_DIR}/somewhere-com_error.log
    CustomLog ${APACHE_LOG_DIR}/somewhere-com_access.log combined
</VirtualHost>
Press CTRL+O to save the file, then press CTRL+X to exit nano. Then at the Bash command prompt type the following commands:
$ sudo bash -c 'echo "192.168.0.6 somewhere.com" >> /etc/hosts'
$ sudo a2ensite somewhere.com.conf
$ sudo systemctl restart apache2
$ sudo a2dissite 000-default.conf
$ sudo systemctl restart apache2
$ sudo mv 000-default.conf 000-default.conf_disable
In the code box above use your domain name instead of “somewhere.com”. Also use your local network IP address of the target server in line number 1. Line 1 is adding an entry for your domain name in “/etc/hosts” file. Use your local LAN IP Address of the Target Server on line1, do not use localhost or 127.0.0.1. Line 2 and 3 enables this new site configuration. Line 4 and 5 disable the default site configuration, then line 6 renames the default configuration also, so that it can not be used by mistake.
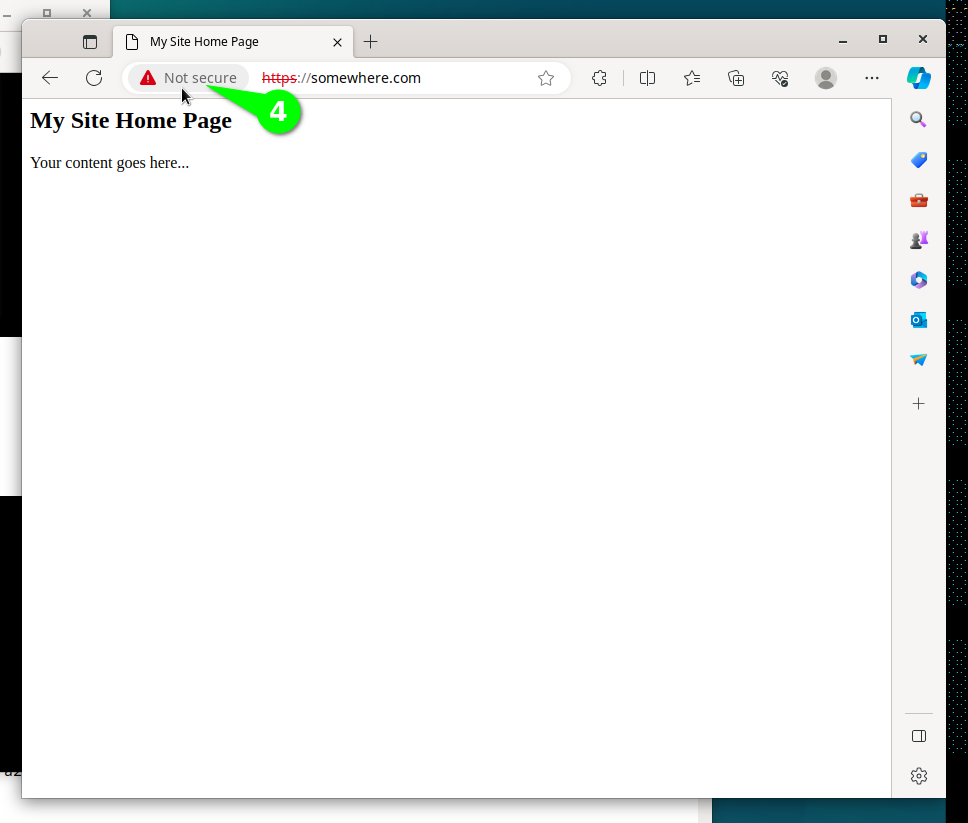
Your page should look like the following screen shot.
Free SSL Certificate for Website and Email Server
Secure communication channels on public Internet that use full channel encryption need an SSL Certificate. Enabling SSL connections to a Web Server, also known as enabling HTTPS protocol, requires that we install SSL Certificates issued by some well-known and trusted Certification Authority (CA). Our email server software will also use these same SSL Certifcates to assert its identity to peer email servers like Gmail, Yahoo or Outlook.com. Traditionally SSL Certificates are issued after paying a fee ranging from CAD$ 100 to CAD$ 300 for 1 certificate. But “Let’s Encrypt” and a few other services provide free SSL certificates, the only down side is that these are valid for a few months only. Fortunately for us the process of renewing these “Let’s Encrypt” certificates can be automated by installing a software robotic agent (Bot) on the target computer.
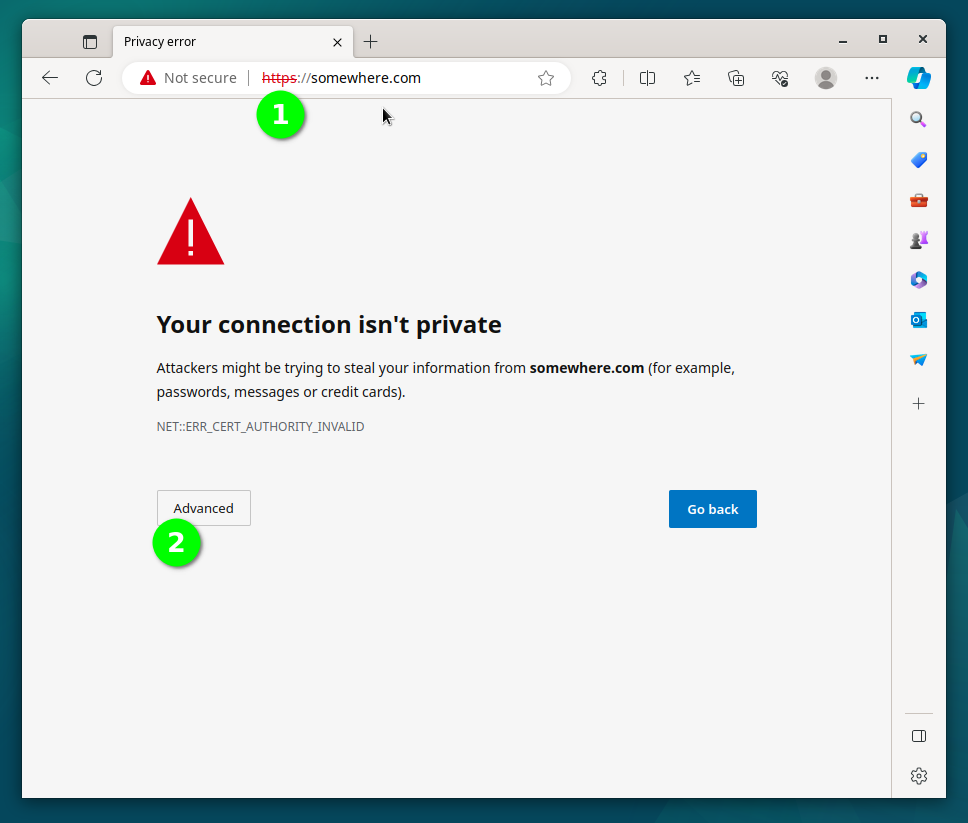
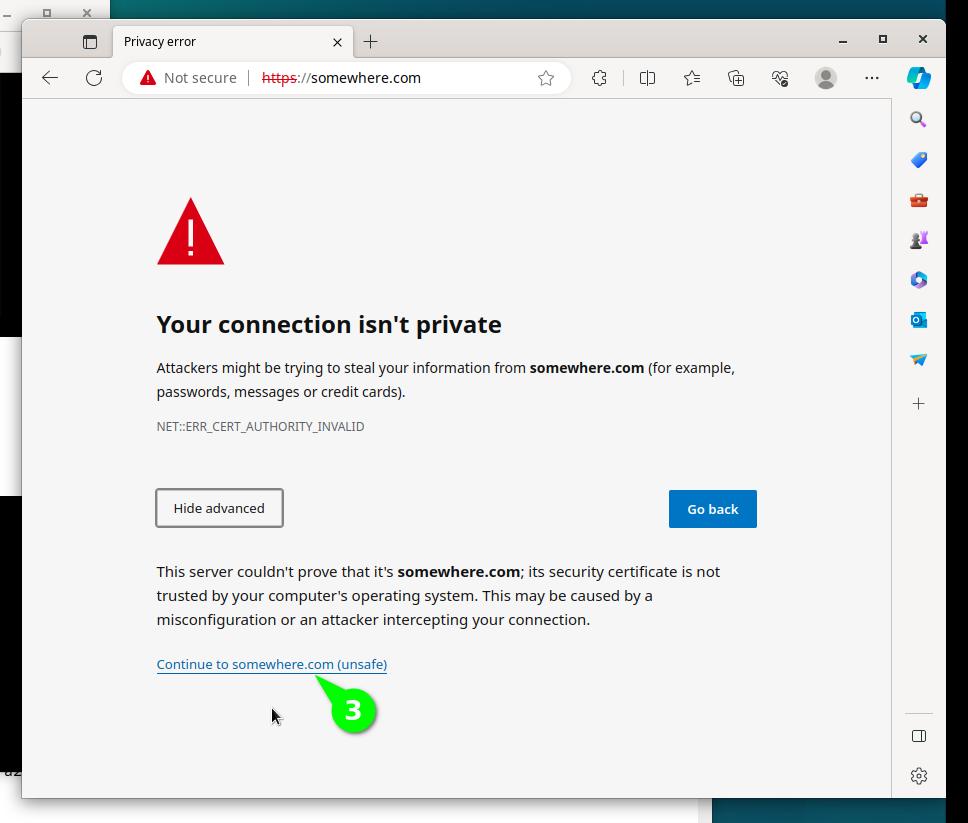
In this section we will first configure Apache2 to use a temporary Self Signed SSL Certificate for HTTPS connections. Then we will install the “Let’s Encrypt” certificate renewal software bot, and use it to get a genuine CA issued SSL certificate valid for 3 months. We can rest assured that before the expiry of this 3 month period, the software bot will automatically renew and re-install it. Self Signed SSL Certificate gives a secure HTTPS connection but suffer from the problem that no well known CA has issued it. For this reason, all modern browsers complain and give security warnings to the visitors of your web site. This is not the case with the “Let’s Encrypt” issued certificate since “Let’s Encrypt” CA is trusted by modern browsers.
$ cd /etc/apache2/sites-available
$ sudo nano somewhere.com.ssl.conf
<IfModule mod_ssl.c>
<VirtualHost somewhere.com:443>
       Protocols http/1.1

       ServerAdmin webmaster@localhost
       ServerName somewhere.com
       DocumentRoot /var/www/html

       ErrorLog ${APACHE_LOG_DIR}/somewhere-com_error.log
       CustomLog ${APACHE_LOG_DIR}/somewhere-com_access.log combined

       SSLEngine on

       SSLCertificateFile      /etc/ssl/certs/ssl-cert-snakeoil.pem
       SSLCertificateKeyFile   /etc/ssl/private/ssl-cert-snakeoil.key

</VirtualHost>
</IfModule>
Then press CTRL+O to save the file, then press CTRL+X to exit nano editor. Then type the following commands in bash command line prompt:
$ sudo a2enmod ssl
$ sudo systemctl restart apache2
$ sudo a2ensite somewhere.com.ssl.conf
$ sudo systemctl restart apache2
$ sudo a2enmod headers
$ sudo systemctl restart apache2
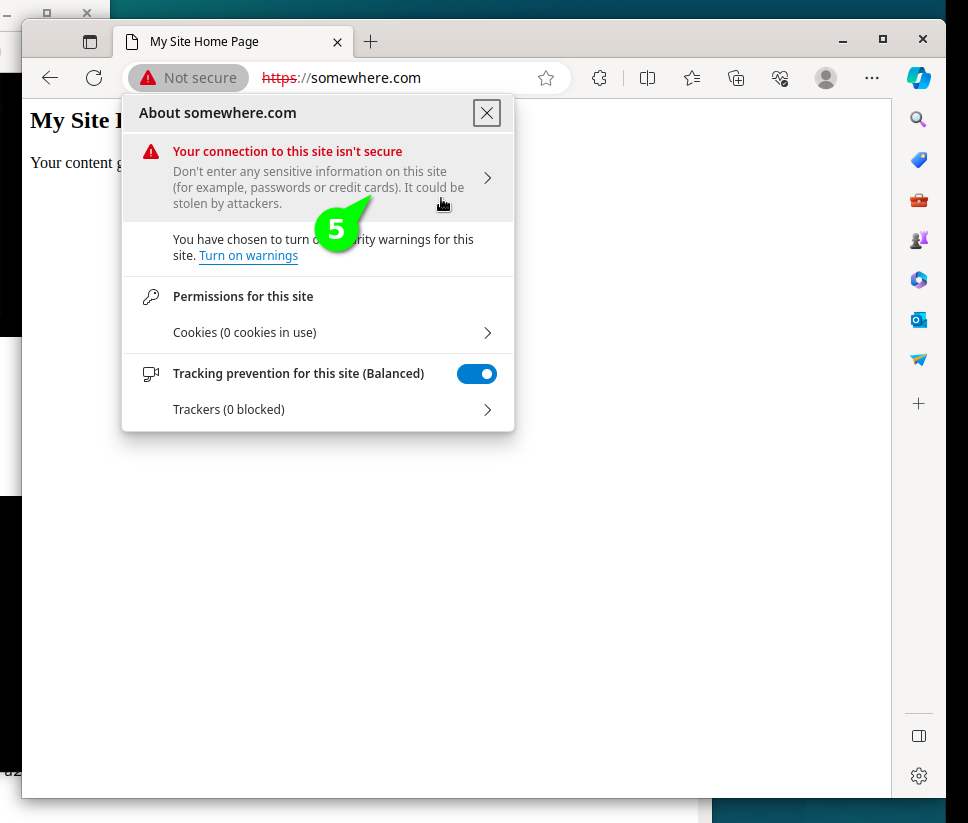
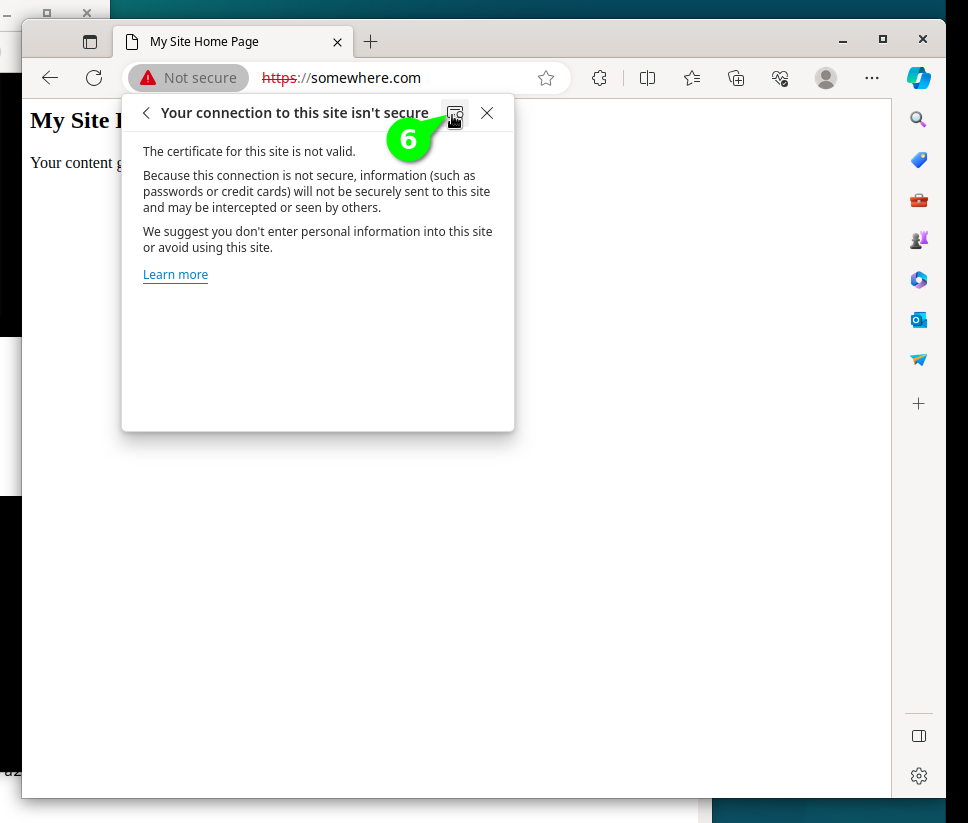
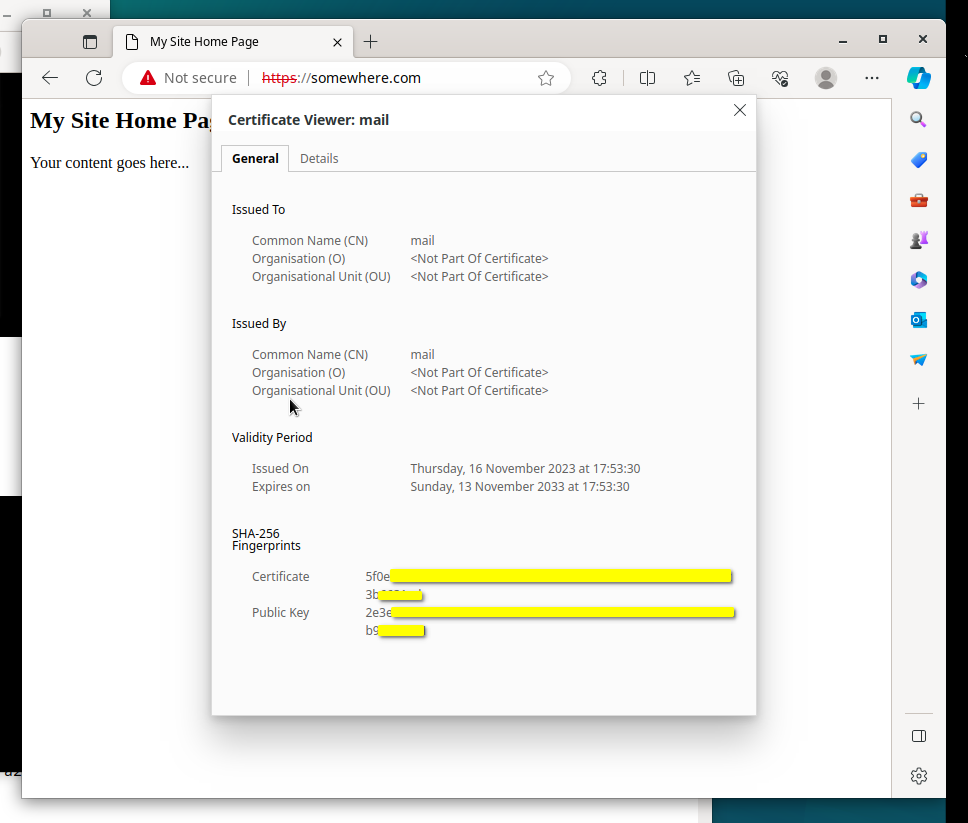
Line number 1 will enable SSL Module in Apache2 configuration. Line 2 will simply restart Apache2. Lines 3 and 4 enable the Self-Signed SSL Configuration for our website. We will see steps to use a genuine “Let’s Encrypt” SSL certificate in a the next paragraphs. If you open the site in browser now, then both URLs should be working, HTTP URL http://somewhere.com, and HTTPS URL https://somewhere.com (HTTPS URL will currently show security alerts in Browser, until we fix the SSL in next paragraph). Please note that you should replace “somewhere.com” with the domain name you have registered in earlier steps. To visually check the current SSL Certificate use the steps shown in the following 6 screen shots.
$ sudo apt install -y certbot python3-certbot-apache
$ sudo certbot --help
To let certbot obtain a new SSL and also install it in your apache configuration use the following command:
$ sudo certbot --apache
Following is a sample interactive session output for your reference.
user01@somewhere:/etc/apache2/sites-available$ sudo certbot --apache
Saving debug log to /var/log/letsencrypt/letsencrypt.log
Enter email address (used for urgent renewal and security notices)
 (Enter 'c' to cancel): your.email@youremail.provider.com

- - - - - - - - - - - - - - - - - - - - - - - - - - - - - - - - - - - - - - - -
Please read the Terms of Service at
https://letsencrypt.org/documents/LE-SA-v1.3-September-21-2022.pdf. You must
agree in order to register with the ACME server. Do you agree?
- - - - - - - - - - - - - - - - - - - - - - - - - - - - - - - - - - - - - - - -
(Y)es/(N)o: y

- - - - - - - - - - - - - - - - - - - - - - - - - - - - - - - - - - - - - - - -
Would you be willing, once your first certificate is successfully issued, to
share your email address with the Electronic Frontier Foundation, a founding
partner of the Let's Encrypt project and the non-profit organization that
develops Certbot? We'd like to send you email about our work encrypting the web,
EFF news, campaigns, and ways to support digital freedom.
- - - - - - - - - - - - - - - - - - - - - - - - - - - - - - - - - - - - - - - -
(Y)es/(N)o: y
Account registered.

Which names would you like to activate HTTPS for?
We recommend selecting either all domains, or all domains in a VirtualHost/server block.
- - - - - - - - - - - - - - - - - - - - - - - - - - - - - - - - - - - - - - - -
1: somewhere.com
- - - - - - - - - - - - - - - - - - - - - - - - - - - - - - - - - - - - - - - -
Select the appropriate numbers separated by commas and/or spaces, or leave input
blank to select all options shown (Enter 'c' to cancel): 1
Requesting a certificate for somewhere.com


----- (FOLLOWING IS FAILURE OUTPUT WHEN YOU DO NOT HAVE A WORKING DOMAIN NAME SETUP) ------
----- (YOUR OUTPUT WILL BE DIFFERENT AND SUCCESFULL - IF ALL PREVIOUS STEPS WERE SETUP CORRECTLY) ------

Certbot failed to authenticate some domains (authenticator: apache). The Certificate Authority reported these problems:
  Domain: somewhere.com
  Type:   dns
  Detail: no valid A records found for somewhere.com; no valid AAAA records found for somewhere.com

Hint: The Certificate Authority failed to verify the temporary Apache configuration changes made by Certbot. Ensure that the listed domains point to this Apache server and that it is accessible from the internet.

Some challenges have failed.
Ask for help or search for solutions at https://community.letsencrypt.org. See the logfile /var/log/letsencrypt/letsencrypt.log or re-run Certbot with -v for more details.
user01@somewhere:/etc/apache2/sites-available$
When Certbot has succesfully installed the certifcate you can check in the SSL Configuration the location of where the 3 months valid SSL Certificate is stored. To see that just use the following command:
user01@somewhere:/etc/apache2/sites-available$ sudo cat sigmaone.ddns.net-le-ssl.conf
<IfModule mod_ssl.c>
<VirtualHost somewhere.com:443>
    Protocols http/1.1

    ServerAdmin webmaster@localhost
    ServerName somewhere.com
    DocumentRoot /var/www/html

    ErrorLog ${APACHE_LOG_DIR}/somewhere_error.log
    CustomLog ${APACHE_LOG_DIR}/somewhere_access.log combined

    SSLEngine on

   ### SSLCertificateFile /etc/ssl/certs/ssl-cert-snakeoil.pem
   ### SSLCertificateKeyFile /etc/ssl/private/ssl-cert-snakeoil.key

    SSLCertificateFile /etc/letsencrypt/live/somewhere.com/fullchain.pem
    SSLCertificateKeyFile /etc/letsencrypt/live/somewhere.com/privkey.pem
    Include /etc/letsencrypt/options-ssl-apache.conf
</VirtualHost>
</IfModule>
user01@somewhere:/etc/apache2/sites-available$
You can also browse to the URL https://somewhere.com
<VirtualHost somewhere.com:80>
    Protocols http/1.1
    ServerAdmin webmaster@localhost
    ServerName somewhere.com
    DocumentRoot /var/www/html

    ErrorLog ${APACHE_LOG_DIR}/somewhere-com_error.log
    CustomLog ${APACHE_LOG_DIR}/somewhere-com_access.log combined

    RedirectMatch permanent ^/(.*)$ https://somewhere.com/$1

    RewriteEngine on
    RewriteCond %{SERVER_NAME} =somewhere.com
    RewriteRule ^ https://%{SERVER_NAME}%{REQUEST_URI} [END,NE,R=permanent]

</VirtualHost>
Installation of Email Server Software (Postfix and Dovecot)
Configuration of your Email Server
To check postfix log messages with our configurations, use the following command:
$ sudo journalctl -u postfix@-.service -f
Press CTRL+C to stop following the logs, or do not use -f in the above command. To show only the log entries since the day before use the following command:
$ sudo journalctl -u postfix@-.service -S yesterday
To save the log entries in a text file, use the following command:
$ sudo journalctl -u postfix@-.service -S yesterday > /path/to/folder/postfix_log_excrept.log
To view Dovecot logs use the command:
$ sudo journalctl -u dovecot -f
Configuration of Email Relay Provider – Incoming and Outgoing
DNS Records for Email
Testing Email Setup
Adding a New User Email Post Box
Connecting to your Email from Android Device
Connection to your Email from PC – Windows Mail
Further Reading
How to secure Postfix using Let’s Encrypt – UpCloud – https://upcloud.com/resources/tutorials/secure-postfix-using-lets-encrypt, Date Visited: August 1, 2023.
Part 2: Install Dovecot IMAP server on Debian & Enable TLS Encryption – LinuxBabe – https://www.linuxbabe.com/mail-server/install-dovecot-imap-server-debian , Date Visited: August 1, 2023
How to Install Dovecot (POP/IMAP) on Debian 10 – TecAdmin – https://tecadmin.net/install-dovecot-on-debian-10/ , Date Visited: August 1, 2023
PostfixAdmin – Create Virtual Mailboxes on Debian 11/10 Mail Server (linuxbabe.com) – https://www.linuxbabe.com/mail-server/postfixadmin-create-virtual-mailboxes-debian , Date Visited: August 21, 2024. Create Mail Boxes in MySQL/MariaDB
Video – How to Install and Configure a Postfix Mail Server with Dovecot on Linux Ubuntu – YouTube – https://www.youtube.com/watch?v=P5NeyiRPYiY , Date Visited: August 1, 2023
Article – How to Install and Configure a Postfix Mail Server with Dovecot on Linux Ubuntu (hetmanrecovery.com) – https://hetmanrecovery.com/recovery_news/how-to-install-and-configure-postfix-mail-server-with-dovecot-on-linux-ubuntu.htm , Date Visited: August 1, 2023
Postfix Standard Configuration Examples (apple.com) – https://opensource.apple.com/source/postfix/postfix-259/postfix/proto/STANDARD_CONFIGURATION_README.html , Date Visited: August 1, 2023
Basics of postfix server configuration – Notes_Wiki (sbarjatiya.com) – https://www.sbarjatiya.com/notes_wiki/index.php/Basics_of_postfix_server_configuration , Date Visited: August 1, 2023
email – Sending and receiving mails using Postfix/Dovecot – Server Fault – https://serverfault.com/questions/1026078/sending-and-receiving-mails-using-postfix-dovecot , Date Visited: August 1, 2023
How to Add Users and Aliases in Postfix | ServerWatch – https://www.serverwatch.com/guides/adding-users-and-aliases-for-postfix/ , Date Visited: August 8, 2023
Tools for Testing:
Online Tool for testing SMTP Settings (wormly.com) – https://www.wormly.com/test-smtp-server , Date Visited: August 1, 2023
Online Tool for testing SSL POP3 Settings (wormly.com) – https://www.wormly.com/test-pop3-mail-server , Date Visited: August 1, 2023
Online tool for inspecting DKIM Record (dmarcian.com) – https://dmarcian.com/dkim-inspector/ , Date Visited: August 1, 2023